Checkpoints
Enable GKE Enterprise
/ 10
Create and register clusters to fleet
/ 20
Config Policy Controller
/ 10
Set up teams for your fleet
/ 20
Deploy an application to the team
/ 20
View team based logs
/ 20
Manage Multi-cluster Workloads at Scale with GKE Fleets and Teams
GSP1240

Overview
GKE Enterprise offers a set of capabilities that help you manage clusters, infrastructure, and workloads. These capabilities are all built around the idea of the fleet: a logical grouping of Kubernetes clusters and other resources that can be managed by the Fleet service, also known as the Hub service.
One of the primary responsibilities of platform administrators is to ensure that application and service teams have the necessary infrastructure resources to run their workloads. With GKE Enterprise's fleet team management features, administrators can easily provision and manage infrastructure resources for different teams, with each team treated as a separate "tenant" on the fleet.
In this lab, you learn about the fleet and fleet team management features of GKE Enterprise to build an Enterprise Developer Platform.
What you'll learn
In this lab, you learn how to perform the following tasks:
- Create GKE clusters
- Register clusters to a fleet
- Set up teams for your fleet and manage its features
- Explore team-based logs
Setup and requirements
Before you click the Start Lab button
Read these instructions. Labs are timed and you cannot pause them. The timer, which starts when you click Start Lab, shows how long Google Cloud resources will be made available to you.
This Qwiklabs hands-on lab lets you do the lab activities yourself in a real cloud environment, not in a simulation or demo environment. It does so by giving you new, temporary credentials that you use to sign in and access Google Cloud for the duration of the lab.
What you need
To complete this lab, you need:
- Access to a standard internet browser (Chrome browser recommended).
- Time to complete the lab.
Note: If you already have your own personal Google Cloud account or project, do not use it for this lab.
Note: If you are using a Pixelbook, open an Incognito window to run this lab.
How to start your lab and sign in to the Google Cloud Console
-
Click the Start Lab button. If you need to pay for the lab, a pop-up opens for you to select your payment method. On the left is a panel populated with the temporary credentials that you must use for this lab.
-
Copy the username, and then click Open Google Console. The lab spins up resources, and then opens another tab that shows the Sign in page.
Tip: Open the tabs in separate windows, side-by-side.
-
In the Sign in page, paste the username that you copied from the Connection Details panel. Then copy and paste the password.
Important: You must use the credentials from the Connection Details panel. Do not use your Qwiklabs credentials. If you have your own Google Cloud account, do not use it for this lab (avoids incurring charges).
-
Click through the subsequent pages:
- Accept the terms and conditions.
- Do not add recovery options or two-factor authentication (because this is a temporary account).
- Do not sign up for free trials.


After a few moments, the Cloud Console opens in this tab.
Task 1. Create GKE Clusters and register to fleet
Enable GKE Enterprise
In this task, begin by enabling the GKE Enterprise.
-
In the Google Cloud console, select the Navigation Menu (
) > Kubernetes Engine > Overview.
-
Click the Learn about GKE Enterprise button. From here, you can see a description of the various features available in GKE Enterprise.
To learn more about the features included with GKE Enterprise, view the details under the Features and Benefits tab.
At this stage, you need to register your fleet and enable GKE Enterprise.
-
Click the Enable GKE Enterprise button.
-
Click Edit Fleet Name or Cluster List.
-
On the Fleet registration page, enter
gke-enterprise-fleetin the Fleet name field. The fleet name cannot be changed after initial creation. -
Click Save to save the Fleet name.
-
Click Confirm to enable GKE Enterprise.
gcloud container fleet create --display-name=gke-enterprise-fleet- Click Close to complete the operation.
Click Check my progress to verify the objective.
Create and register clusters to fleet using CLI
Next, create and register two clusters; an Autopilot cluster, and a Standard cluster.
- In the Cloud console, click the Cloud Shell icon
in the upper-right corner.
Perform the steps below in the Cloud Shell environment.
- Create a GKE Autopilot cluster (with the
--asyncflag to avoid waiting for the first cluster to provision) and register to the fleet:
- Create and register a second GKE Standard cluster:
- Ensure that both the clusters are running:
- View the fleet overview in the Overview section.
Click Check my progress to verify the objective.
Task 2. Manage fleet-level features
Fleets let you manage enterprise and other fleet-enabled features across multiple clusters at once.
Configure Fleet settings:
With GKE Enterprise, you can create fleet-level default settings for your GKE clusters. From here, you can view the status of features, configure and edit fleet-level settings, and apply them to your clusters. Here are the fleet-level default settings you can configure according to what you need for this lab:
- Service Mesh
- Config Sync
- Continuous validation for Binary Authorization
- Policy Controller
- Security posture
After configuring fleet-level settings, any GKE cluster you register during cluster creation is automatically configured with your fleet-level configurations.
- In the Cloud Shell environment, to enable a feature for your fleet use the following command:
To begin managing the fleet-level features, configure the Policy.
-
In the Google Cloud console, select the Navigation Menu (
-
Find Policy Controller and click Configure.
-
On the Policy Controller feature manager page, click Customize Fleet Setting to configure fleet-level settings.
-
Choose the policy bundle version 1.17.1 and enable Pod Security Policies v2022, then save the changes.
-
Click Configure to configure fleet settings.
-
Select both clusters to sync it with the default fleet-level settings.
Click Check my progress to verify the objective.
Within your fleet settings, you can configure Security posture, set Vulnerabilities scan to Basic, save the changes, and configure fleet settings.
Task 3. Set up teams for your fleet
Fleet team management features help administrators to easily allocate and manage infrastructure resources for their teams. Each team is treated as a distinct "tenant" within the fleet. This allows teams to run and manage their own workloads, view logs, track resource utilization, error rates, and other metrics that are relevant to their specific clusters and namespaces.
For more information about the fleet team management feature, refer to the Fleet team management documentation.
In this task, you set up and manage fleet usage for a team.
-
On the Google Cloud console, select the Navigation Menu (
-
Click Create Team Scope.
Team scopes let you define subsets of fleet resources on a per-team basis, with each scope associated with one or more fleet member clusters. Team scopes can include clusters on Google Cloud or outside Google Cloud, though all the clusters must be members of the same fleet. A cluster can be associated with more than one team scope, letting different teams run workloads on the same cluster.
- On the Team Basics page, in the Name field, enter
gcc-dev-teamfor your team scope.
You won't be able to change this name once the team scope is created.
-
To add team members to the scope, click Add Team Member.
-
For Type, select User to add an individual team member.
-
For User, type
as the email address. -
For Role, select Admin to specify the access level of the team member.
-
On the Team Basics page, after adding team members to your scope, click Continue.
-
In the Clusters dropdown, select both the fleet clusters
gke-enterprise-01-apandgke-enterprise-02-stto associate with this team scope, and click OK. -
On the Clusters page, after adding clusters to your scope, click Continue.
-
On the Namespaces page, click Add Namespace.
Fleet namespaces provide a way to control who has access to specific namespaces within your fleet. By default, any namespaces with the same name defined on clusters in the fleet are treated as if they were the same namespace. However, fleet team management provides a way to add more granular control over namespaces.
You can create fleet namespaces within specific team scopes, and then grant team members access to them only on clusters within their team scope. Fleet namespaces can be used in the same way as any other Kubernetes namespace on the member clusters in the team scope. Platform admins can create fleet namespaces themselves, or, with some extra permissions, delegate namespace creation to team admins.
-
For Name, enter
gcc-dev-ns. -
To create the team scope, click Create Team Scope.
Click Check my progress to verify the objective.
Task 4. Deploy an application to the team
Cymbal Bank is a sample HTTP-based web app that simulates a bank's payment processing network, allowing users to create artificial bank accounts and complete transactions.
In this task, you deploy this application to the gke-enterprise-01-ap cluster registered in the team.
Perform the steps below in the Cloud Shell environment.
- Retrieve the credentials for the cluster using the following command:
- To simplify the name of the Kubernetes context, rename it to the name of the cluster:
- Clone the application repository:
- Deploy application to the
gke-enterprise-01-apGKE cluster ingcc-dev-nsnamespace:
- Wait approximately 3-4 minutes and verify all the pods are running:
Click Check my progress to verify the objective.
Task 5. View team-based logs and Fleet overview
View team-based logs
Fleet logs allow you view logs at the entire fleet level, or for specific team scopes.
Fleet scope logs show Container and Pod logs for applications owned by a team deployed in a specific fleet scope with multiple fleet-level namespaces.
In this task, you enable fleet logs using Google Cloud CLI and view team-based logs.
- Enable fleet logging:
-
Click the team scope
gcc-dev-team, whose logs you want to view, and click the Logs tab. -
Select Container Logs to filter the logs view.
Click Check my progress to verify the objective.
Additional permissions are required if you are registering a cluster to a fleet in a different project (also known as cross-project registration). See Set up cross-project logging permissions for more details.
You can grant access to users to view container logs and Pod logs. For more information, see Grant team access to logs.
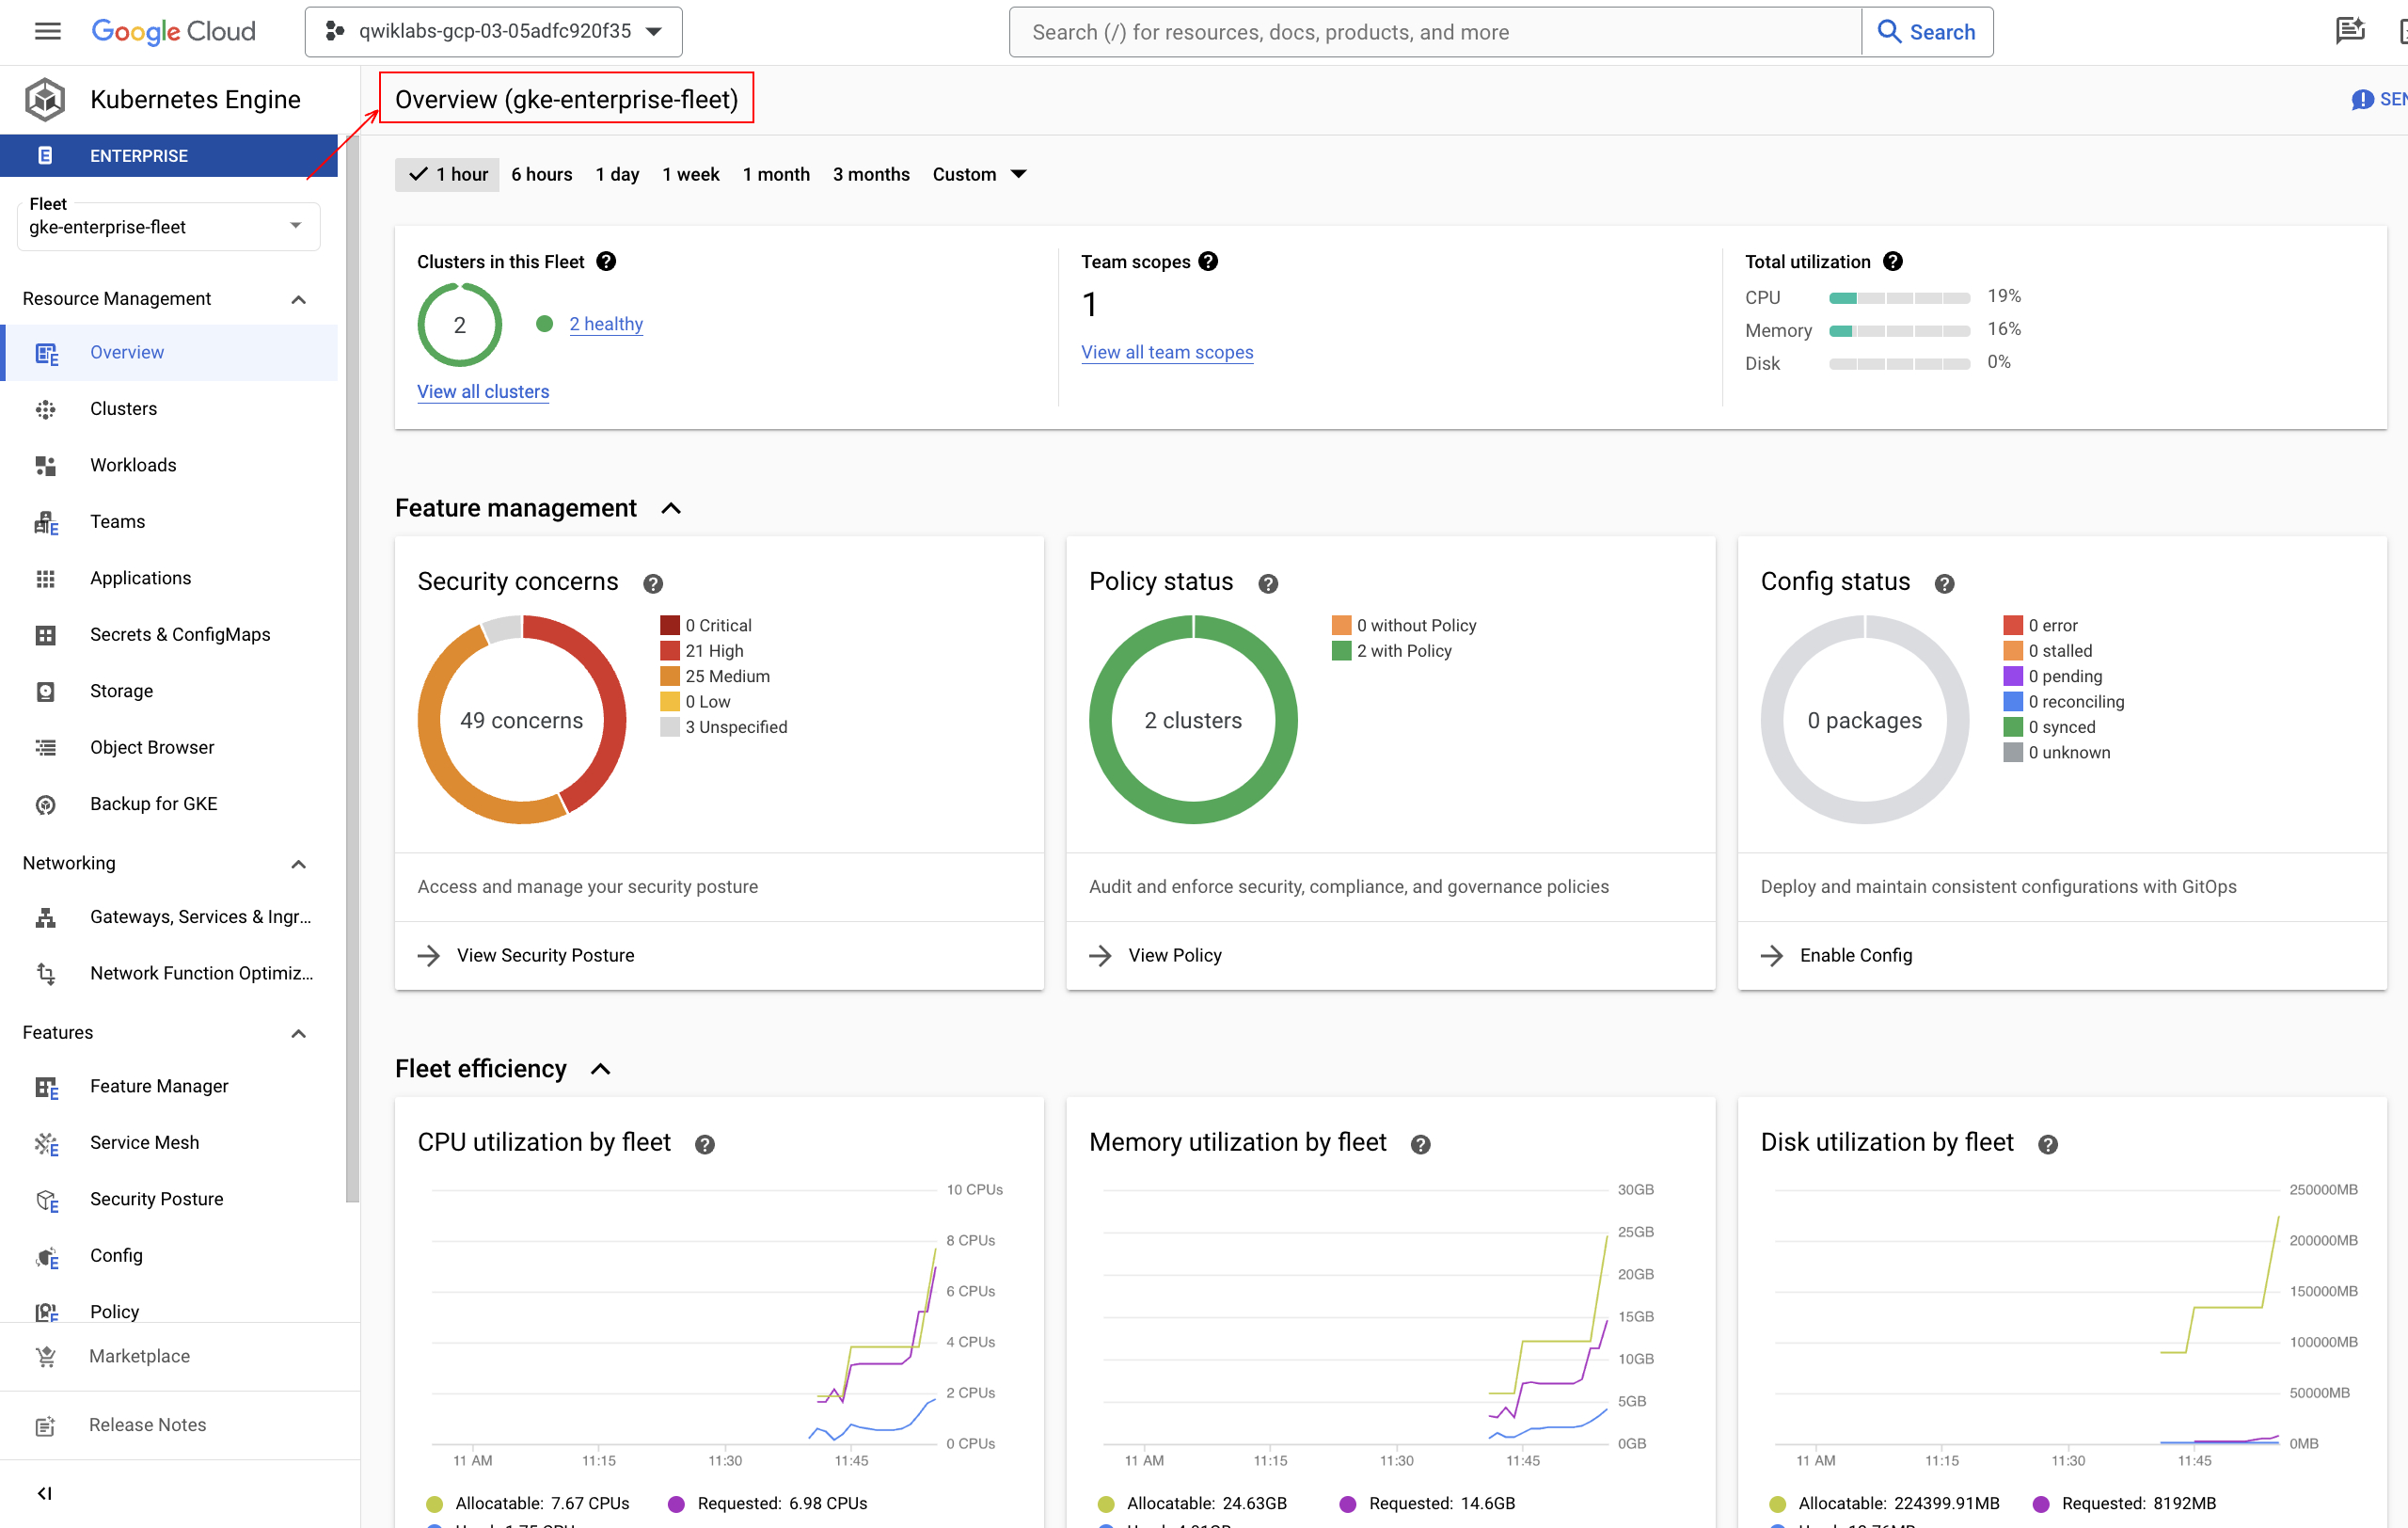
Fleet overview
The GKE Enterprise Overview dashboard in the Google Cloud console provides a "big picture" overview of your fleet. The overview helps you use your GKE Enterprise features by showing you how many security concerns your fleet has, your fleet-wide policy controller coverage, and the synchronization status of your config sync packages.
In addition, the dashboard provides a fleet-level view of resource utilization of your fleets, clusters, and teams. You can use this information to help optimize spending, application design, and resource allocation, including CPU, memory, and disk utilization.
To view the overview dashboard with your fleet gke-enterprise-fleet, go to the GKE Enterprise overview in the console.
Congratulations!
You now know how to use key features of GKE Enterprise to build an Enterprise Developer Platform.
Next steps / Learn more
-
For more information about the difference between GKE Standard and Enterprise editions, refer to the GKE editions documentation.
-
For more information about enabling the fleet logging, see Enable fleet logging.
Manual last updated May 1, 2024
Lab last tested March 20, 2024
Copyright 2024 Google LLC All rights reserved. Google and the Google logo are trademarks of Google LLC. All other company and product names may be trademarks of the respective companies with which they are associated.