チェックポイント
Create and use an external table
/ 60
Import data via the console
/ 40
Explore a lakehouse
 IMPORTANT:
 Make sure to complete this hands-on lab on a desktop/laptop only.
 There are only 5 attempts permitted per lab.
 As a reminder – it is common to not get every question correct on your first try, and even to need to redo a task; this is part of the learning process.
 Once a lab is started, the timer cannot be paused. After 1 hour and 30 minutes, the lab will end and you’ll need to start again.
 For more information review the Lab technical tips reading.
Activity overview
As a cloud data analyst, you'll likely encounter three main data architectures: data lakes, data warehouses, and lakehouses.
A data lake is a database system that stores large amounts of raw data in its original format until it’s needed. A guiding principle is to collect data first, and decide what is useful later.
A data warehouse is a database that consolidates data from multiple source systems for data consistency, accuracy, and efficient access. A guiding principle is to select and organize data that is known to be useful and can be trusted.
A lakehouse is a hybrid data architecture that combines the features of a data lake with those of a data warehouse.
Cloud Storage is a great tool for a data lake. BigQuery can be configured as a data warehouse, as a data lake, or as a lakehouse.
In this exercise, you'll combine data stored in a Cloud Storage data lake with data stored in a BigQuery data warehouse to learn more about how to integrate data from different sources and store it in a way that is optimized for analysis. Then, you'll explore this hybrid architecture to learn more about how lakehouses work.
Scenario
You are a cloud data analyst at TheLook eCommerce, a global clothing company that specializes in innovative fashion and ethical and sustainable sourcing.
Meredith, the head merchandiser, has asked you to help them complete a series of tasks to understand which products are selling, which products are being returned, and ensure that the costs of each product is up to date.
To get the job done, you’ll need to combine data from a data lake and a data warehouse. By doing that, you’ll use BigQuery as a lakehouse. You can use this hybrid architecture to find the data to address Meredith’s business concerns.
After receiving your task assignment from Meredith, you ask Artem, the data architect, for some guidance.
Artem explains that while an external table only points to data stored elsewhere, like in a data lake. In this case, you would likely want the data to be stored in a standard BigQuery table because it will be easier to manage and update.
Meredith has also asked you to import data from a CSV file to update the product costs, so you ask Artem if you should use an external table for that task too.
Artem explains that while an external table only points to data that is stored someplace else, like a data lake, in this case you probably want the data stored in a standard BigQuery table, since it will be easier to manage and update.
You thank Artem and feel ready to take on Meredith’s tasks.
Here's how you'll do this task. First, you’ll create an external table that points to data stored in a data lake. Then, you’ll join the external table with a standard BigQuery table and explore the combined data. Finally, you’ll import data from a CSV file into a standard BigQuery table to better understand the difference between external and standard tables in BigQuery.
Setup
Before you click Start Lab
Read these instructions. Labs are timed and you cannot pause them. The timer, which starts when you click Start Lab, shows how long Google Cloud resources will be made available to you.
This practical lab lets you do the activities yourself in a real cloud environment, not in a simulation or demo environment. It does so by giving you new, temporary credentials that you use to sign in and access Google Cloud for the duration of the lab.
To complete this lab, you need:
- Access to a standard internet browser (Chrome browser recommended).
- Time to complete the lab---remember, once you start, you cannot pause a lab.
How to start your lab and sign in to the Google Cloud console
-
Click the Start Lab button. On the left is the Lab Details panel with the following:
- Time remaining
- The Open Google Cloud console button
- The temporary credentials that you must use for this lab
- Other information, if needed, to step through this lab
Note: If you need to pay for the lab, a pop-up opens for you to select your payment method. -
Click Open Google Cloud console (or right-click and select Open Link in Incognito Window) if you are running the Chrome browser. The Sign in page opens in a new browser tab.
Tip: You can arrange the tabs in separate, side-by-side windows to easily switch between them.
Note: If the Choose an account dialog displays, click Use Another Account. -
If necessary, copy the Google Cloud username below and paste it into the Sign in dialog. Click Next.
You can also find the Google Cloud username in the Lab Details panel.
- Copy the Google Cloud password below and paste it into the Welcome dialog. Click Next.
You can also find the Google Cloud password in the Lab Details panel.
- Click through the subsequent pages:
- Accept the terms and conditions
- Do not add recovery options or two-factor authentication (because this is a temporary account)
- Do not sign up for free trials
After a few moments, the Console opens in this tab.

Task 1. Create and use an external table
After some preliminary data analysis, Meredith is concerned that there are too many pairs of jeans being returned. To help gain a better understanding of the situation and which distribution centers have the most returns, Meredith has asked you to create a report that details how many product returns have been made for jeans at each distribution center. The return information is stored as a data lake using Cloud Storage. The distribution information is stored as a data warehouse in a BigQuery standard table.
In this task, you'll create an external table to point to the data stored in Cloud Storage and then join that table with the BigQuery standard table. This will combine data from the data lake and data warehouse. Then, you’ll query the combined data to get Meredith the results they need.
- In the Cloud console, from the Navigation menu (
), select BigQuery.
- In the Query Editor, click on the Compose new query (+) icon. The Untitled tab opens.
In the following query, note the file type. Parquet is a popular format for string data in cloud data analytics and is commonly used to create external tables in BigQuery. Since Parquet files are compressed, they take up less storage space. They are also easy to manage since the data schema is stored within the file itself.
- Copy and paste the following command into the Untitled tab:
CREATE OR REPLACE EXTERNAL TABLE `thelook_gcda.product_returns` OPTIONS ( format ="PARQUET", uris = ['gs://sureskills-lab-dev/DAC2M2L4/returns/returns_*.parquet'] );
When you create an external table in BigQuery, you’re creating a table that points to data stored in an external location, such as Cloud Storage. The data types of the columns in the external table will be inferred from the data in the external location.
- Click Run.
Now, check the table properties for the table you just created.
-
In the Explorer pane, expand the list of datasets by clicking the drop-down arrow next to the project ID.
-
Click the drop-down arrow next to the thelook_gcda dataset.
-
Select the product_returns table. Refresh your page if it’s not listed yet.
-
Click on the Details tab and study the details in the External Data Configuration section.
-
Check the Source URI(s) column and notice the pointer to gs://. In the BigQuery UI, the Source URI(s) column shows the location of the data source for a table. The gs:// prefix in the Source URI(s) column indicates that the data is stored in Cloud Storage. When you create an external table, the data is stored at the source location in Cloud Storage but can be queried just like a standard BigQuery table.
-
Copy the following query into the Query Editor:
Note: Each time you run a new query in the Query Editor, you can either replace the old query by copying and pasting the new query over the previous one in the same Untitled tab, or you can click on the Compose a new query (+) icon to open a new Untitled tab to run the query in. SELECT COUNT(*) AS row_count FROM `thelook_gcda.product_returns`;
This query returns a row count of 20,000.
- Click Run.
Next, check the properties for the distribution_centers table.
-
In the Explorer pane, in the thelook_gcda dataset, select the distribution_centers table.
-
Click on the Details tab and study the details in the Table info and Storage info sections. This is not an external table as no external files are referenced.
Now, check the product_returns table data you created in the previous steps.
-
Copy the following query into the Query Editor:
SELECT * FROM `thelook_gcda.product_returns` ORDER BY status_date desc LIMIT 10;
This query returns the 10 most recent product returns based on the return status date.
-
Click Run.
-
Copy the following query into the Query Editor:
SELECT dc.name, pr.* FROM `thelook_gcda.product_returns` AS pr INNER JOIN `thelook_gcda.distribution_centers` AS dc ON dc.id = pr.distribution_center_id;
This query joins data from a cloud storage bucket (product_returns) with data stored in BigQuery (a standard table, distribution_centers), and returns the distribution center name (distribution_centers.name) along with all the columns from the returns data in the Parquet file.
-
Click Run.
-
Copy the following query into the Query Editor:
SELECT dc.name AS distribution_center, p.category, COUNT(*) AS product_return_count FROM `thelook_gcda.product_returns` AS pr INNER JOIN `thelook_gcda.distribution_centers` AS dc ON dc.id = pr.distribution_center_id INNER JOIN `thelook_gcda.products` p ON p.id = pr.product_id WHERE p.category = "Jeans" GROUP BY dc.name, p.category;
This query generates the information Meredith requested. The query displays the distribution center name (distribution_centers.name) and the number of products in the "Jeans" category (product.category) being returned.
- Click Run.
Click Check my progress to verify that you have completed this task correctly.
Task 2. Import data via the console (from BigQuery Studio)
A list of product names and updated product costs were sent from a key manufacturer. Meredith needs to have this data updated to reflect these new costs to make sure they have the most up-to-date information in their reports.
The manufacturer sent the list in CSV format and tech support has copied it to a Cloud Storage bucket. Tech support also sent you a screenshot of the file so you have an idea of what should be displayed:
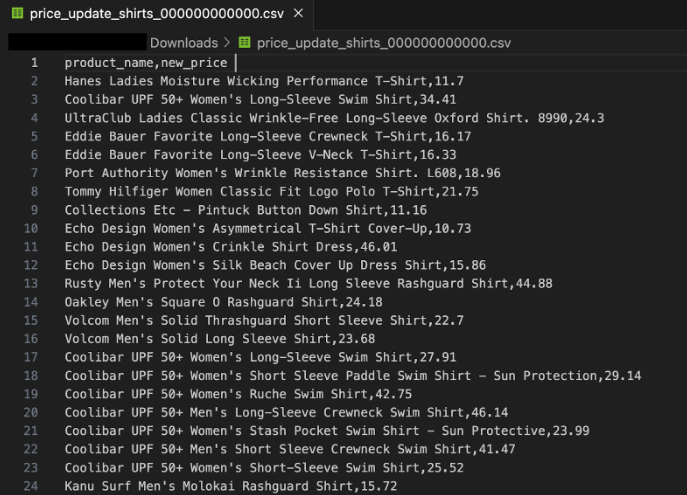
The file is located in the Cloud Storage bucket “sureskills-lab-dev” in the price_update folder. In this task, you'll import the data into the thelook_gcda dataset.
- On the Explorer bar, click + ADD to add a data source to the project.
- Select Google Cloud Storage.
- For Select file from GCS bucket, type sureskills-lab-dev/DAC2M2L4/price_update/price_update_shirts.csv
- For File format, select CSV.
- In the Destination section, for Dataset, select thelook_gcda.
- In the Table field, enter shirt_price_update
- Verify that the Table type field is set to Native table. This indicates that BigQuery will copy the content of the CSV file from the Cloud Storage bucket into its own storage.
- For Schema, check Auto detect. BigQuery will try to guess the data types by checking the values for each column.
- Click Create Table.
Click Check my progress to verify that you have completed this task correctly.
Conclusion
Great work!
By helping Meredith learn more about product sales and returns, as well as updated product costs, you have given them the information they need to complete their reports and better understand TheLook eCommerce's product line.
You also gained practical experience in combining data stored in a Cloud Storage data lake with data stored in a BigQuery data warehouse. This helped you learn more about how to integrate data from different sources and store it in a way that is optimized for analysis. You also explored how this hybrid architecture works.
Finally, you imported data from a CSV file into a standard BigQuery table. This helped you learn about the different ways you can work and store data from multiple sources in BigQuery.
You’re well on your way to understanding how to use a data lakehouse and combine data on Cloud Storage with BigQuery.
Examples of differences between Standard Tables and External Tables:
| Standard Table | External Table | |
|---|---|---|
| Where the data lives | “Inside” BigQuery. | “Outside” BigQuery, in Cloud Storage. |
| CREATE TABLE (DDL) Statement - External Files" | No reference to external files. | Must have a reference to external files. |
| CREATE TABLE Statement - File Format | Has no references to file formats like CSV or Parquet. | Must specify the type of external file referenced. |
| Data Storage Format | An internal, BigQuery-specific format called Capacitor. | Several supported formats including CSV, Parquet, AVRO, and Iceberg. |
| Performance | High | Can be high, depending on factors including data size, file format, and partitioning structure. |
| CREATE TABLE Statement - Example | CREATE TABLE thelook_gcda.products (Product_id INT, Product_name STRING, Active BOOLEAN); | CREATE EXTERNAL TABLE thelook_gcda.product_returns OPTIONS (format="PARQUET", uris = ['gs://sureskills-lab-dev/DAC2M2L4/returns/returns_*.parquet']); |
There are additional technical differences, capabilities, and limitations between these two types of table that are outside the scope of this lab. For more information, Google "BigQuery Table Types" or check the Introduction to tables documentation.
End your lab
Before you end the lab, make sure you’re satisfied that you’ve completed all the tasks. When you're ready, click End Lab and then click Submit.
Ending the lab will remove your access to the lab environment, and you won’t be able to access the work you've completed in it again.
Copyright 2024 Google LLC All rights reserved. Google and the Google logo are trademarks of Google LLC. All other company and product names may be trademarks of the respective companies with which they are associated.