チェックポイント
Setup the Cloud Storage Bucket
/ 40
Clone the Dataflow Job
/ 30
Setting up a streaming architecture on GCP
/ 30
SingleStore on Google Cloud
- GSP1096
- Overview
- Setup and requirements
- Task 1. Launch your own SingleStore Cluster
- Task 2. Connecting SingleStore and Google Cloud
- Task 3. Creating Schema and interacting with SingleStore
- Task 4. Check out the data in lab (Optional)
- Task 5. Setup a Cloud Storage Bucket
- Task 6. Pub/Sub and Dataflow
- Task 7. Setting up a streaming architecture on Google Cloud
- Task 8. Start Pipelines
- Task 9. Run Operational Analytic Queries
- Congratulations!
GSP1096

Overview
This lab gives you hands-on experience deploying SingleStoreDB and combining it with Google Cloud's cloud native products like Pub/Sub, Dataflow and Cloud Storage. To demonstrate these product features, work with the NYC public taxi dataset.
The flow of the lab is to first deploy the SingleStoreDB through your local browser and create the appropriate schema. Then, use Pub/Sub to push the data to Cloud Storage in real time with the help of Dataflow. The data generated and stored in object storage is consumed using SingleStoreDB's native pipeline. Once SingleStoreDB has ingested the data, you run queries and interact with SingleStore.
What you'll learn
- How to log in and navigate the Google Cloud
- How to create a SingleStore DB instance/cluster
- How to use Cloud Shell to connect and create schema on SingleStoreDB
- How to create Pub/Sub topics and subscriptions, and how to pull and push data to other services
- How to create a Dataflow streaming job
- Use SingleStore native pipeline to load data from object storage
- How to run queries and interact with your data in SingleStore
Prerequisites
- Familiarity with Google Cloud and SingleStore is helpful but is not required.
Setup and requirements
Before you click the Start Lab button
Read these instructions. Labs are timed and you cannot pause them. The timer, which starts when you click Start Lab, shows how long Google Cloud resources will be made available to you.
This hands-on lab lets you do the lab activities yourself in a real cloud environment, not in a simulation or demo environment. It does so by giving you new, temporary credentials that you use to sign in and access Google Cloud for the duration of the lab.
To complete this lab, you need:
- Access to a standard internet browser (Chrome browser recommended).
- Time to complete the lab---remember, once you start, you cannot pause a lab.
How to start your lab and sign in to the Google Cloud console
-
Click the Start Lab button. If you need to pay for the lab, a pop-up opens for you to select your payment method. On the left is the Lab Details panel with the following:
- The Open Google Cloud console button
- Time remaining
- The temporary credentials that you must use for this lab
- Other information, if needed, to step through this lab
-
Click Open Google Cloud console (or right-click and select Open Link in Incognito Window if you are running the Chrome browser).
The lab spins up resources, and then opens another tab that shows the Sign in page.
Tip: Arrange the tabs in separate windows, side-by-side.
Note: If you see the Choose an account dialog, click Use Another Account. -
If necessary, copy the Username below and paste it into the Sign in dialog.
{{{user_0.username | "Username"}}} You can also find the Username in the Lab Details panel.
-
Click Next.
-
Copy the Password below and paste it into the Welcome dialog.
{{{user_0.password | "Password"}}} You can also find the Password in the Lab Details panel.
-
Click Next.
Important: You must use the credentials the lab provides you. Do not use your Google Cloud account credentials. Note: Using your own Google Cloud account for this lab may incur extra charges. -
Click through the subsequent pages:
- Accept the terms and conditions.
- Do not add recovery options or two-factor authentication (because this is a temporary account).
- Do not sign up for free trials.
After a few moments, the Google Cloud console opens in this tab.

Task 1. Launch your own SingleStore Cluster
At this point you should be logged into the Google Cloud in an Incognito window.
- In another tab, go to the SingleStore Portal. You should see the below page:
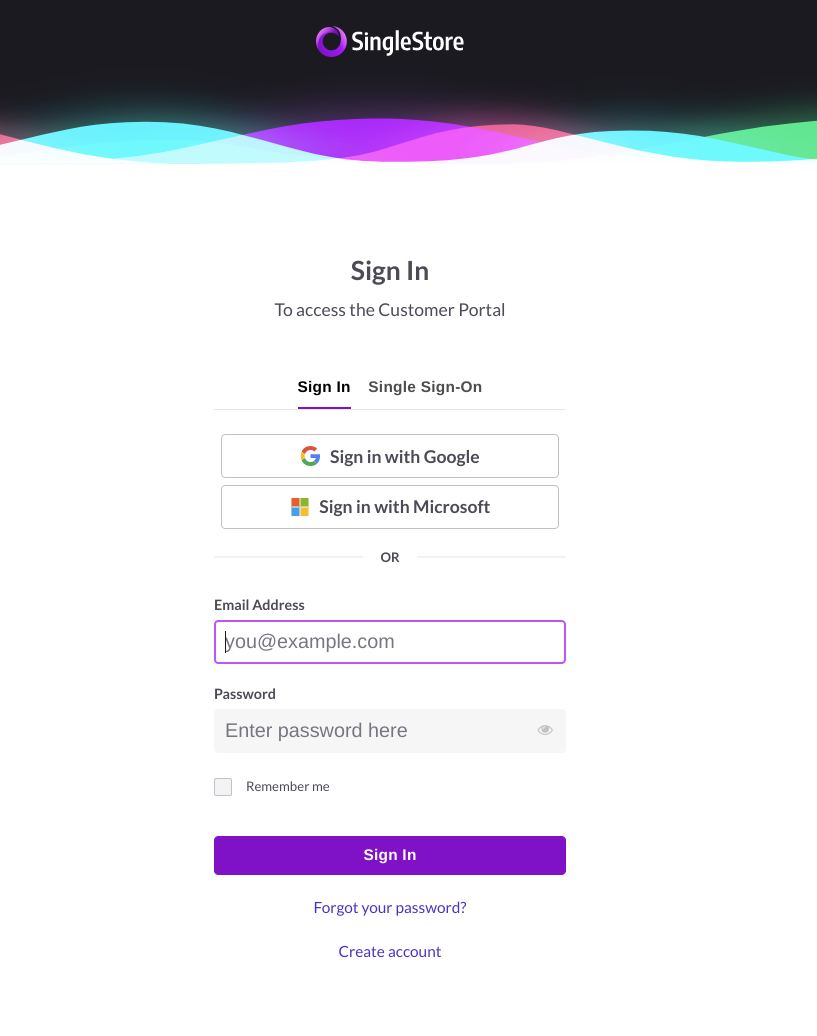
- Click Sign in with Google and enter the Qwiklabs Username and Password from the lab.
- Check the checkbox for Accept Terms of Service & Privacy Policy and click Continue.
- Select Launch in the Cloud when asked how you would like to deploy SingleStore.
- Select Test product features or performance when asked what you plan on using SingleStore for.
- Select I'm building a new application when asked what your primary data source is to migrate.
- For Company Name, write
Test Company. - Select the country you are based out of and select Developer / Software Engineer for your Job Title.
- Click Submit.
Create the Workspace
Next you're prompted to Workspace Group. Your screen should look like this:
-
On the upper right corner click + Workspace Group.
-
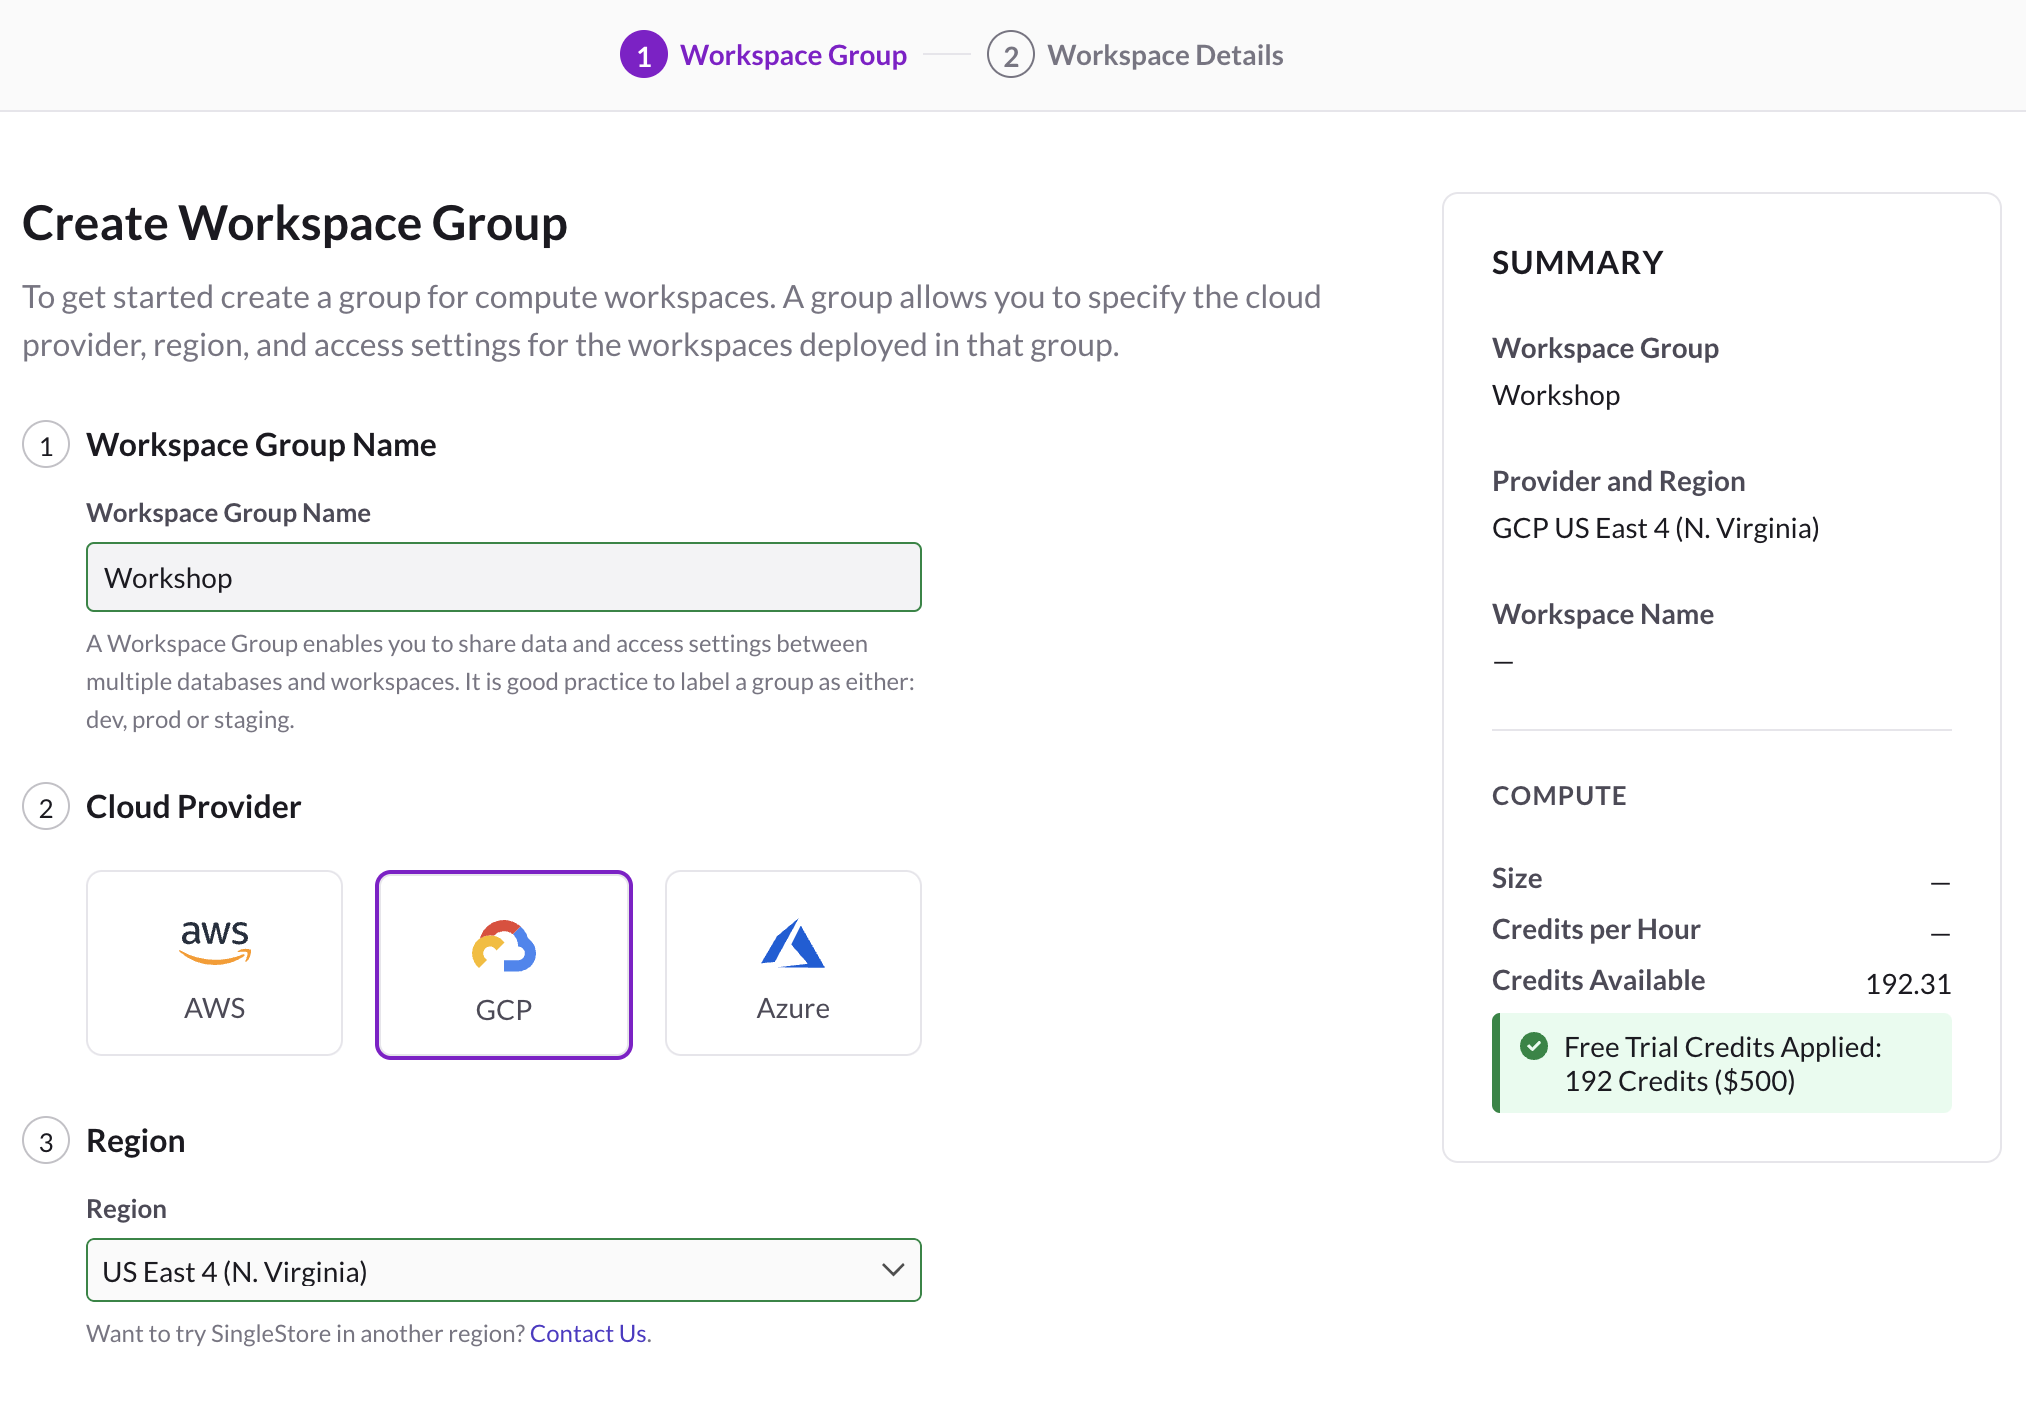
On the Create Workspace Group page, configure the following settings:
- Workspace Group Name: Workshop
- Cloud Provider: GCP
- Region: US East 4 (N.Virginia), this should be the default, if not, change accordingly.
Your configuration should look like this:
-
Click Next.
-
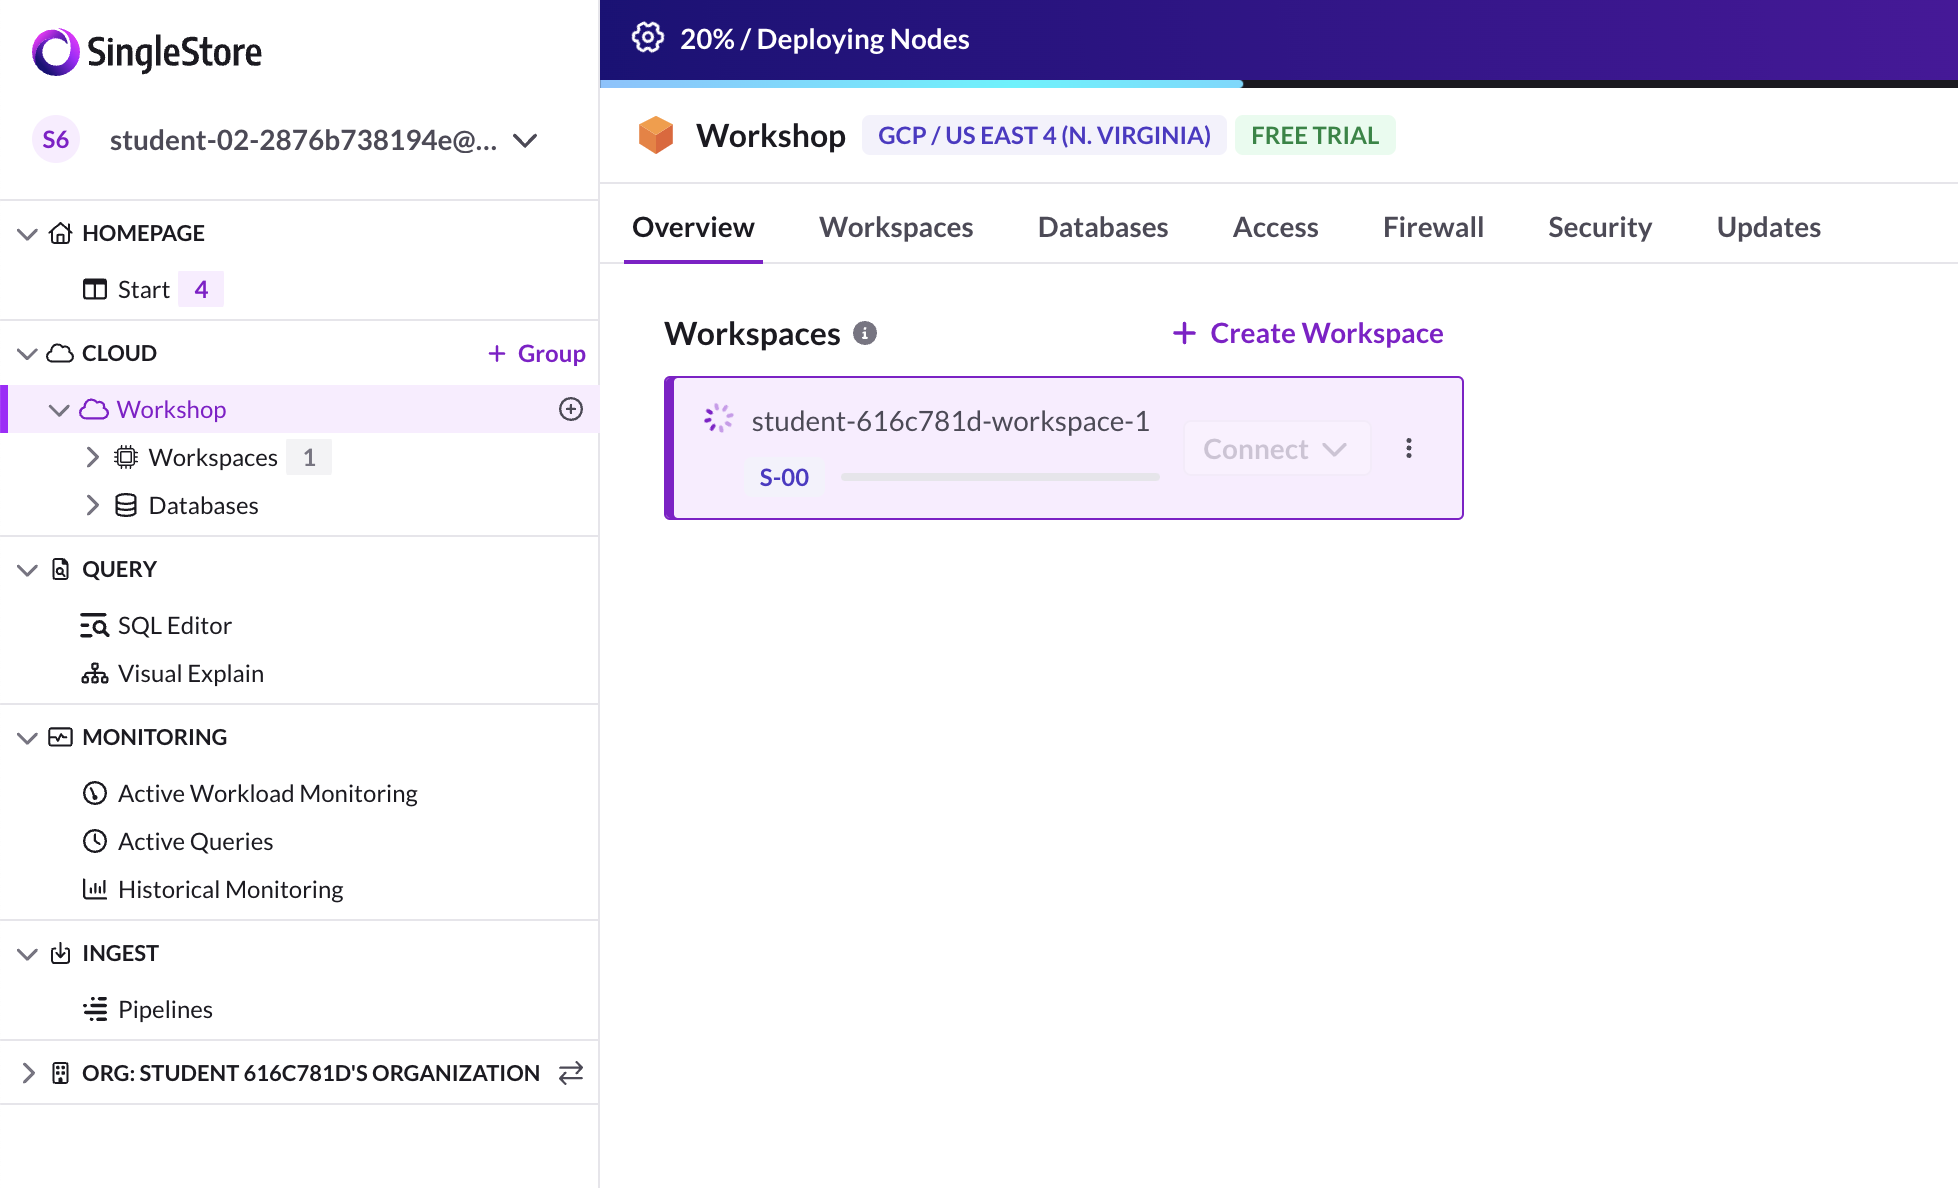
On the Workspace Details page, leave the default settings and click Create Workspace.
Wait a few minutes as your Cluster spins up, while waiting your screen should look like this:
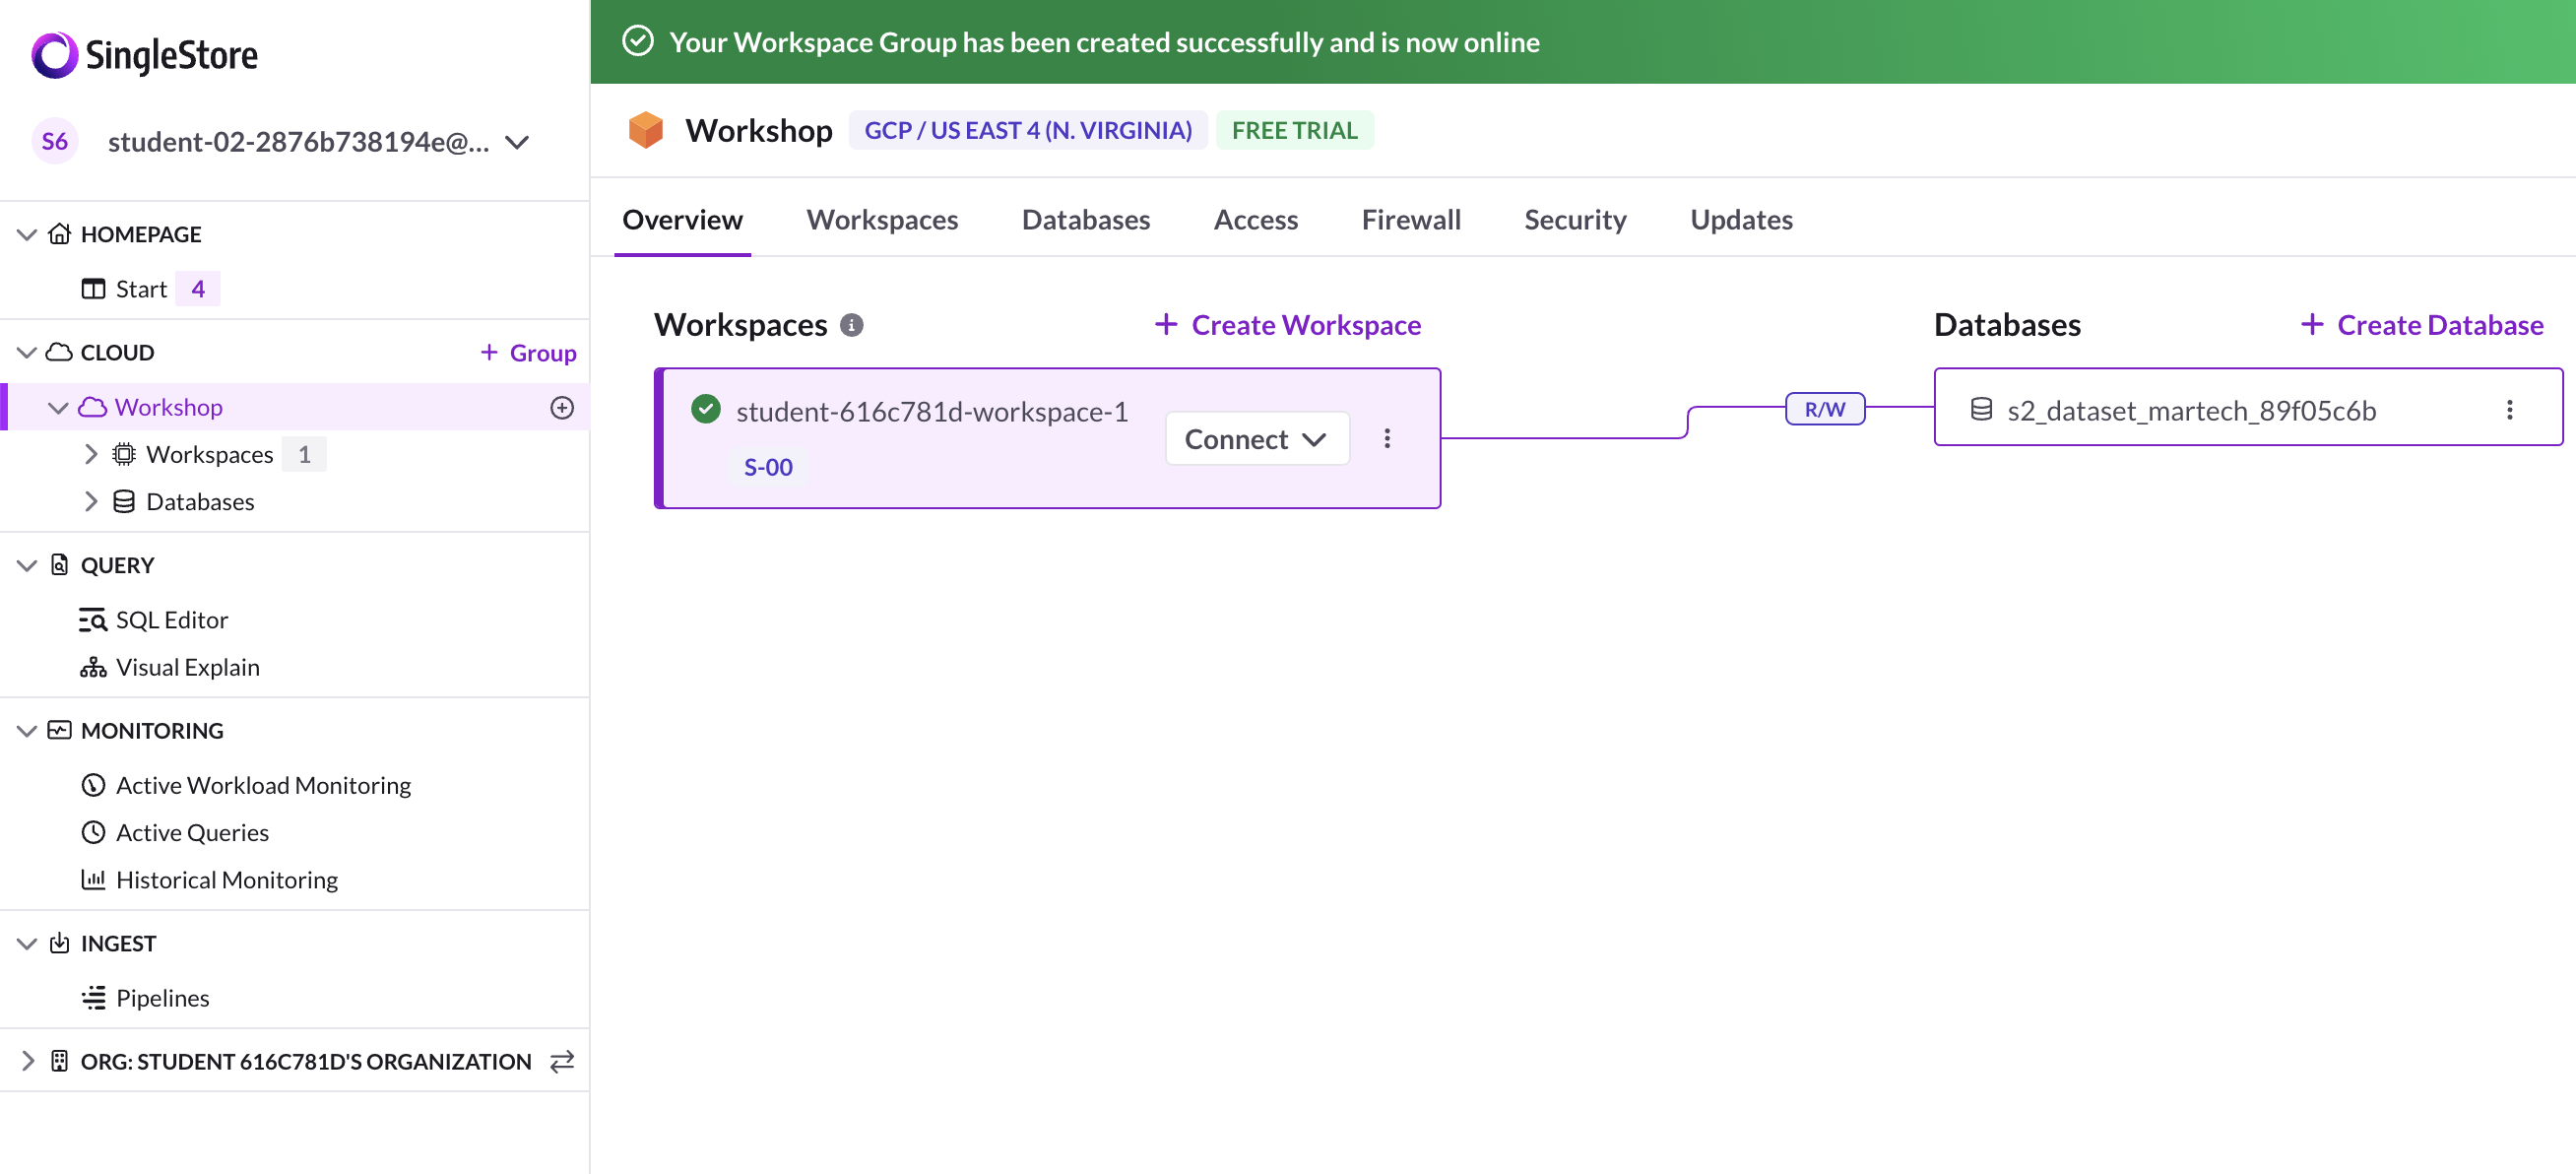
After 3-5 min, the screen should result in:
Task 2. Connecting SingleStore and Google Cloud
-
Before connecting to the SingleStore Workspace, navigate back to the Google Cloud Console.
-
Open a new Cloud Shell window by clicking the icon in the top right corner of the console. If prompted click Continue.
Clone Github repository
- In Cloud Shell, run the following commands to clone the Github repository to download the code for the workshop.
-
Go back to the SingleStore Portal.
-
Click the dropdown arrow next to Connect and then click Connect Directly.
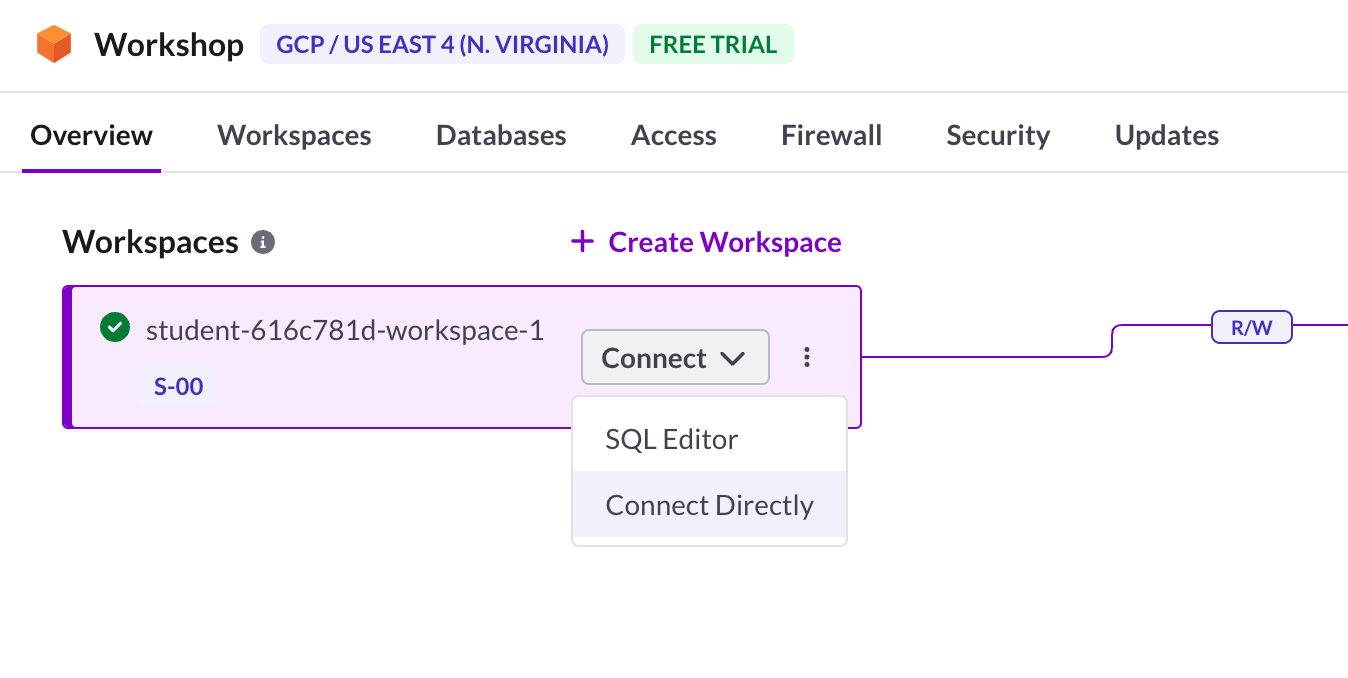
-
On the Connect to Workspace page, first copy the password that was generated for you. You will need this in the next section.
-
Next, click Change IP Settings. This will open a new page with the IP settings.
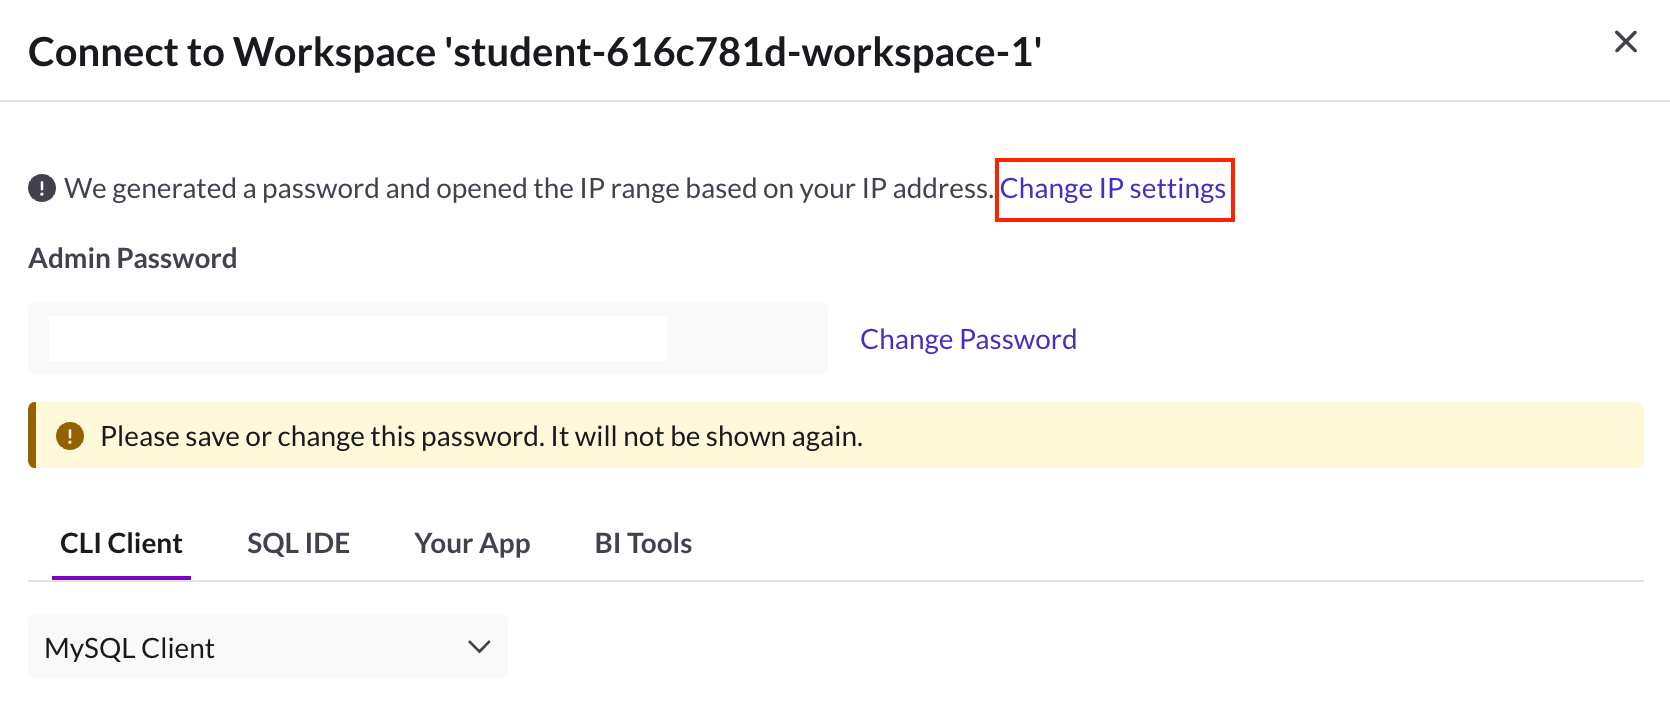
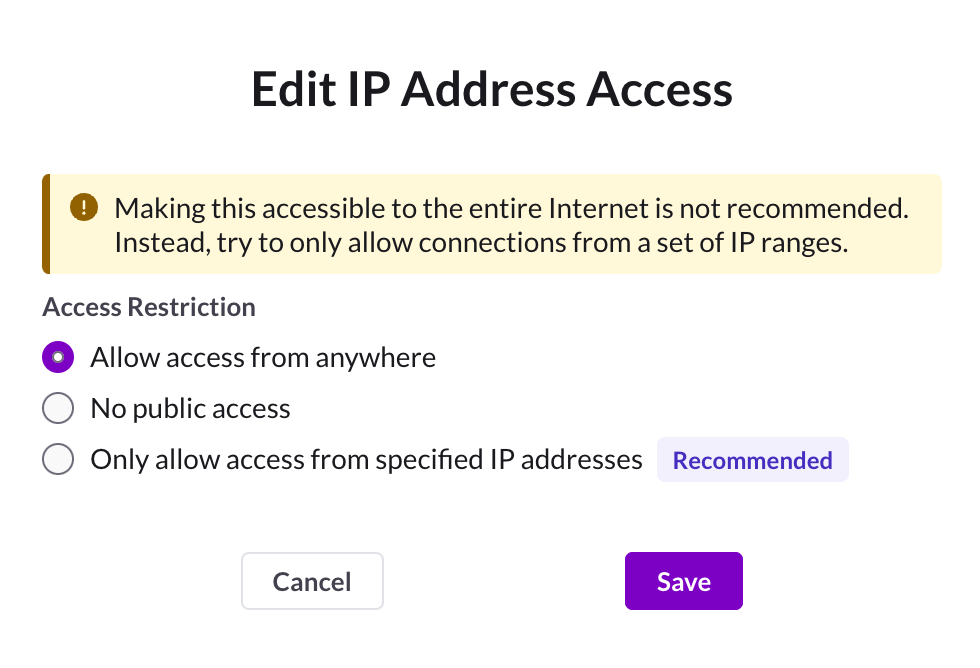
- On the Firewall > Secure Connections page, under Inbound IP Allowlist click Edit.
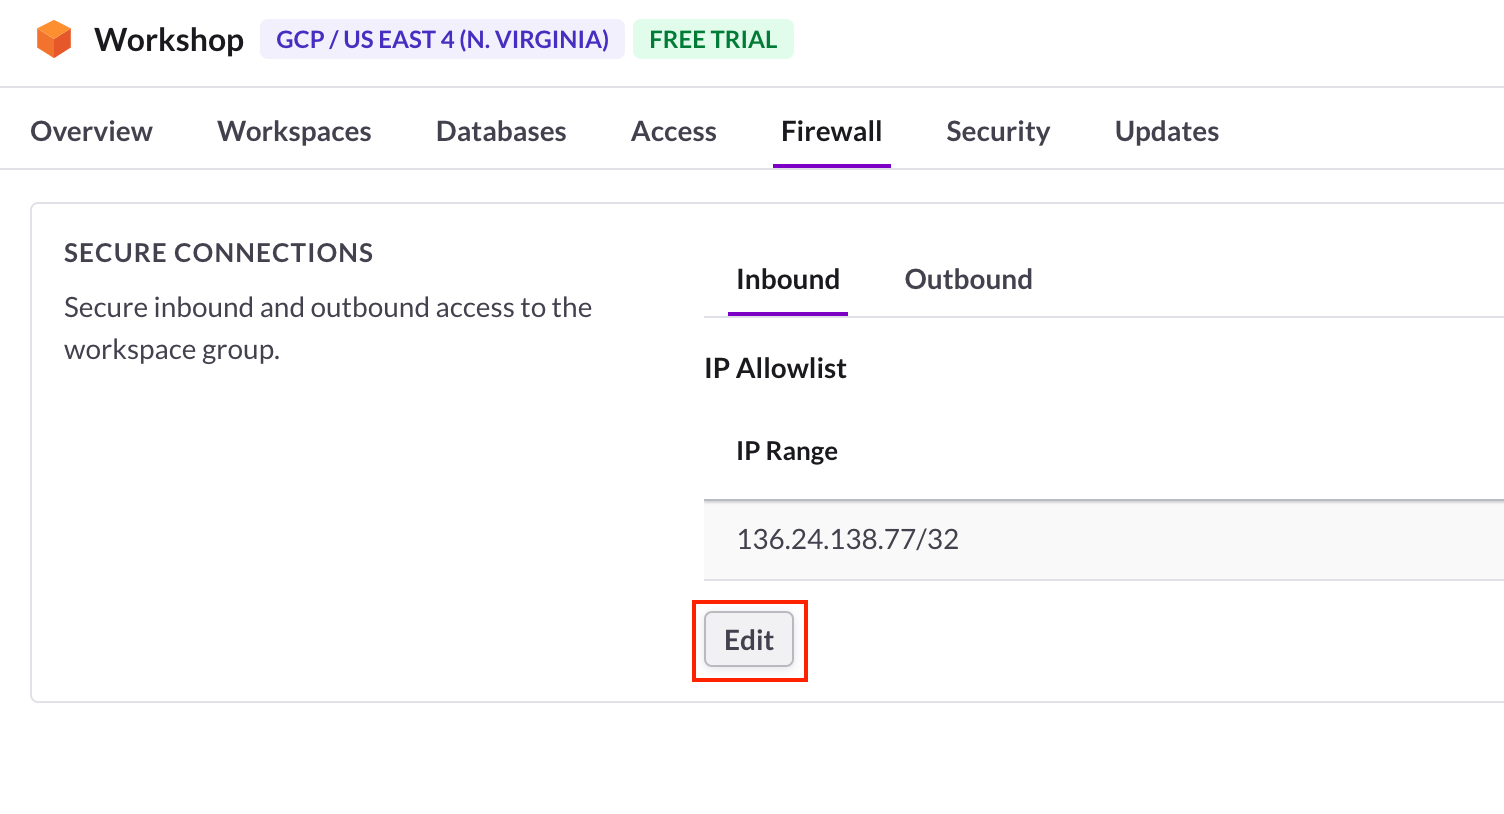
- On the Edit IP Address Access popup, select
Allow access from anywherethen click Save.
-
Go back to the Connect to Workspace page by clicking the Overview tab then selecting Connect > Connect Directly on your workspace.
-
Click Copy next to the MySQL Command. This will copy the command to your clipboard.
The MySQL command should resemble: mysql -u admin -h svc-e8c31e44-9985-4db9-ae9e-1ddad5b40f65-dml.gcp-virginia-1.svc.singlestore.com -P 3306 --default-auth=mysql_native_password -p
-
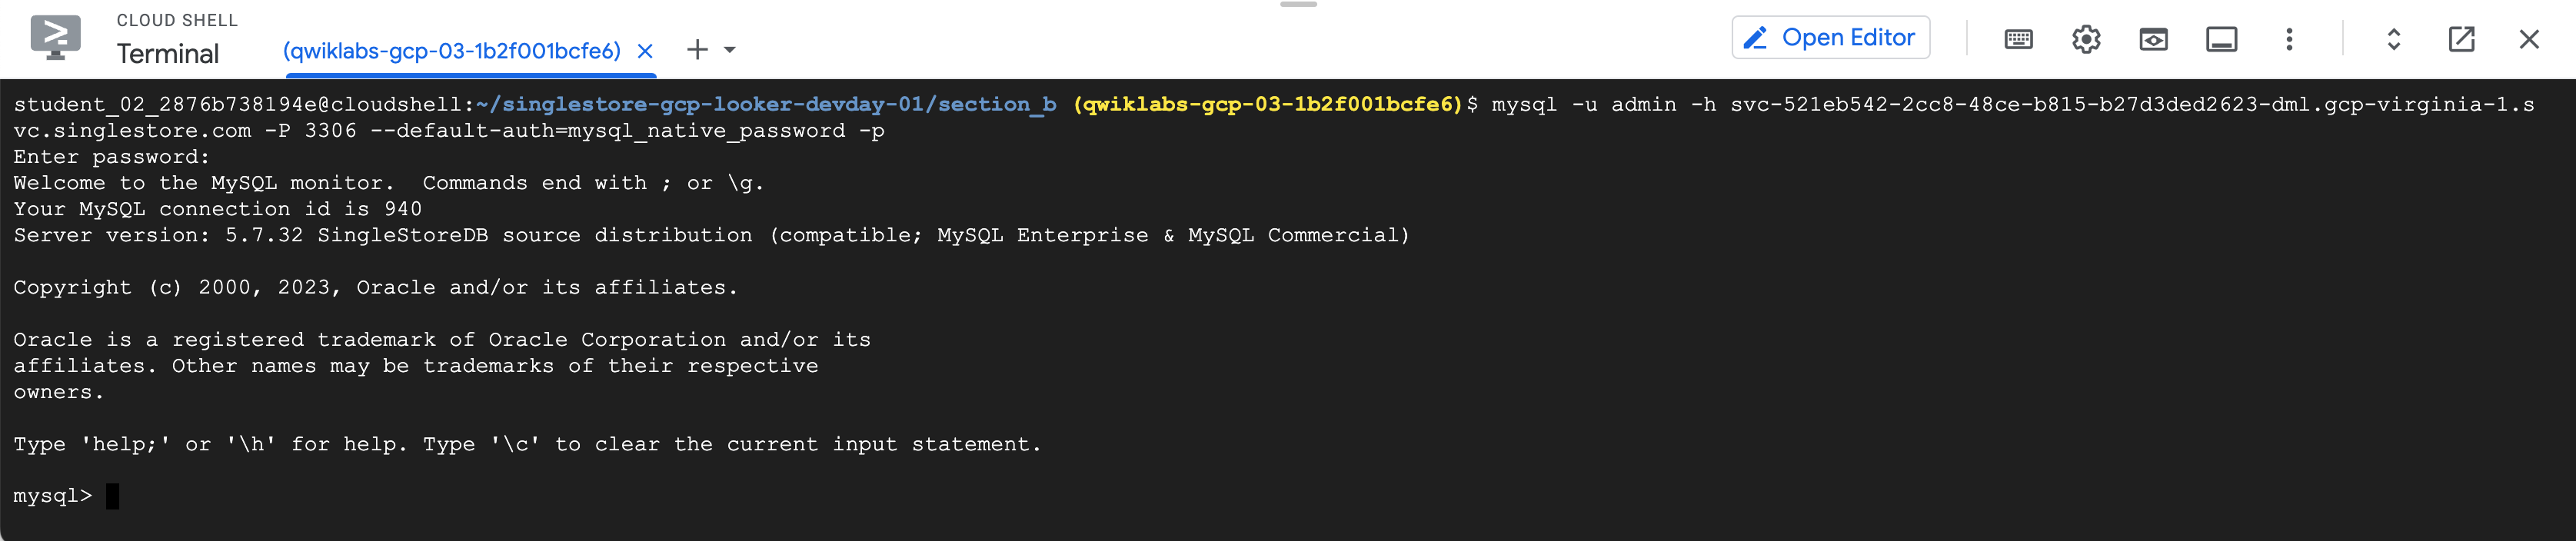
Navigate back to the Google Cloud Console and open your Cloud Shell window.
-
Paste the MySQL command into the terminal.
-
Enter your Cluster Password that you copied earlier when prompted. You're now at a mysql> prompt.
Task 3. Creating Schema and interacting with SingleStore
In this section you will build the Table Schemas.
Use the following DDL to create a new database named nyc_taxi.
- At the mysql> prompt, run:
You should see similar results:
You have created the Schema and the Database tables are listed.
- Run the following command:
The output of this query is "Empty set" or "0", this is because you have only created the Schema and the Table is empty.
Pause here for a second. You've successfully created the SingleStore Database and connected to it. The Schema is set up but there is no data yet.
If you have extra time, feel free to poke around and explore SingleStore!
Task 4. Check out the data in lab (Optional)
In today's lab, you use the NYC Taxi data, this data can be found in BigQuery's public datasets or on the NYC Open Data website.
This data has been put in a Cloud Storage bucket for you ahead of time, so there is no need for you to download/import this into Google Cloud. You can explore the data if you so wish.
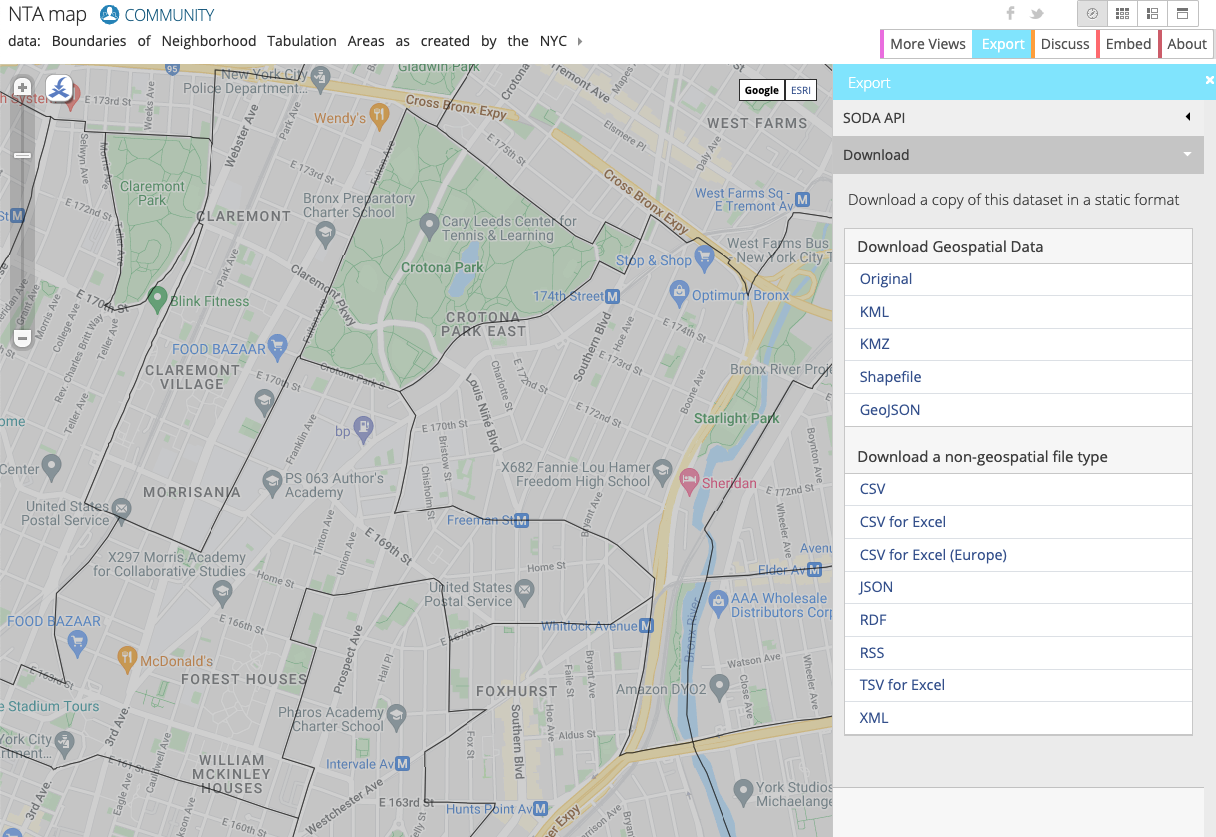
The NYC Open Data website provides free datasets related to New York City, including taxi, education, police data and more.
In this lab, you work with the NYC Department of City Planning's Neighborhood Tabulation Areas (NTAs) which provides information on approximate zones and neighborhoods in NYC. You use this in combination with NYC Taxi data to see where passengers were picked up and dropped off.
On the website you can visualize the data by neighborhood:
Task 5. Setup a Cloud Storage Bucket
- Before starting this section, open up a new Cloud Shell/ Terminal tab by clicking the "+" button:

In Google Cloud, the two main ways to set up resources are through the GUI and CLI. In the lab you use CLI to create the bucket and get the latest neighborhood data from NYC taxi cab website.
- Copy the below commands to create your own bucket and import the data from a public bucket into your own bucket:
Notice there is already another bucket created in your project. Don't worry about this bucket, it's a staging/temp storage location for Dataflow.
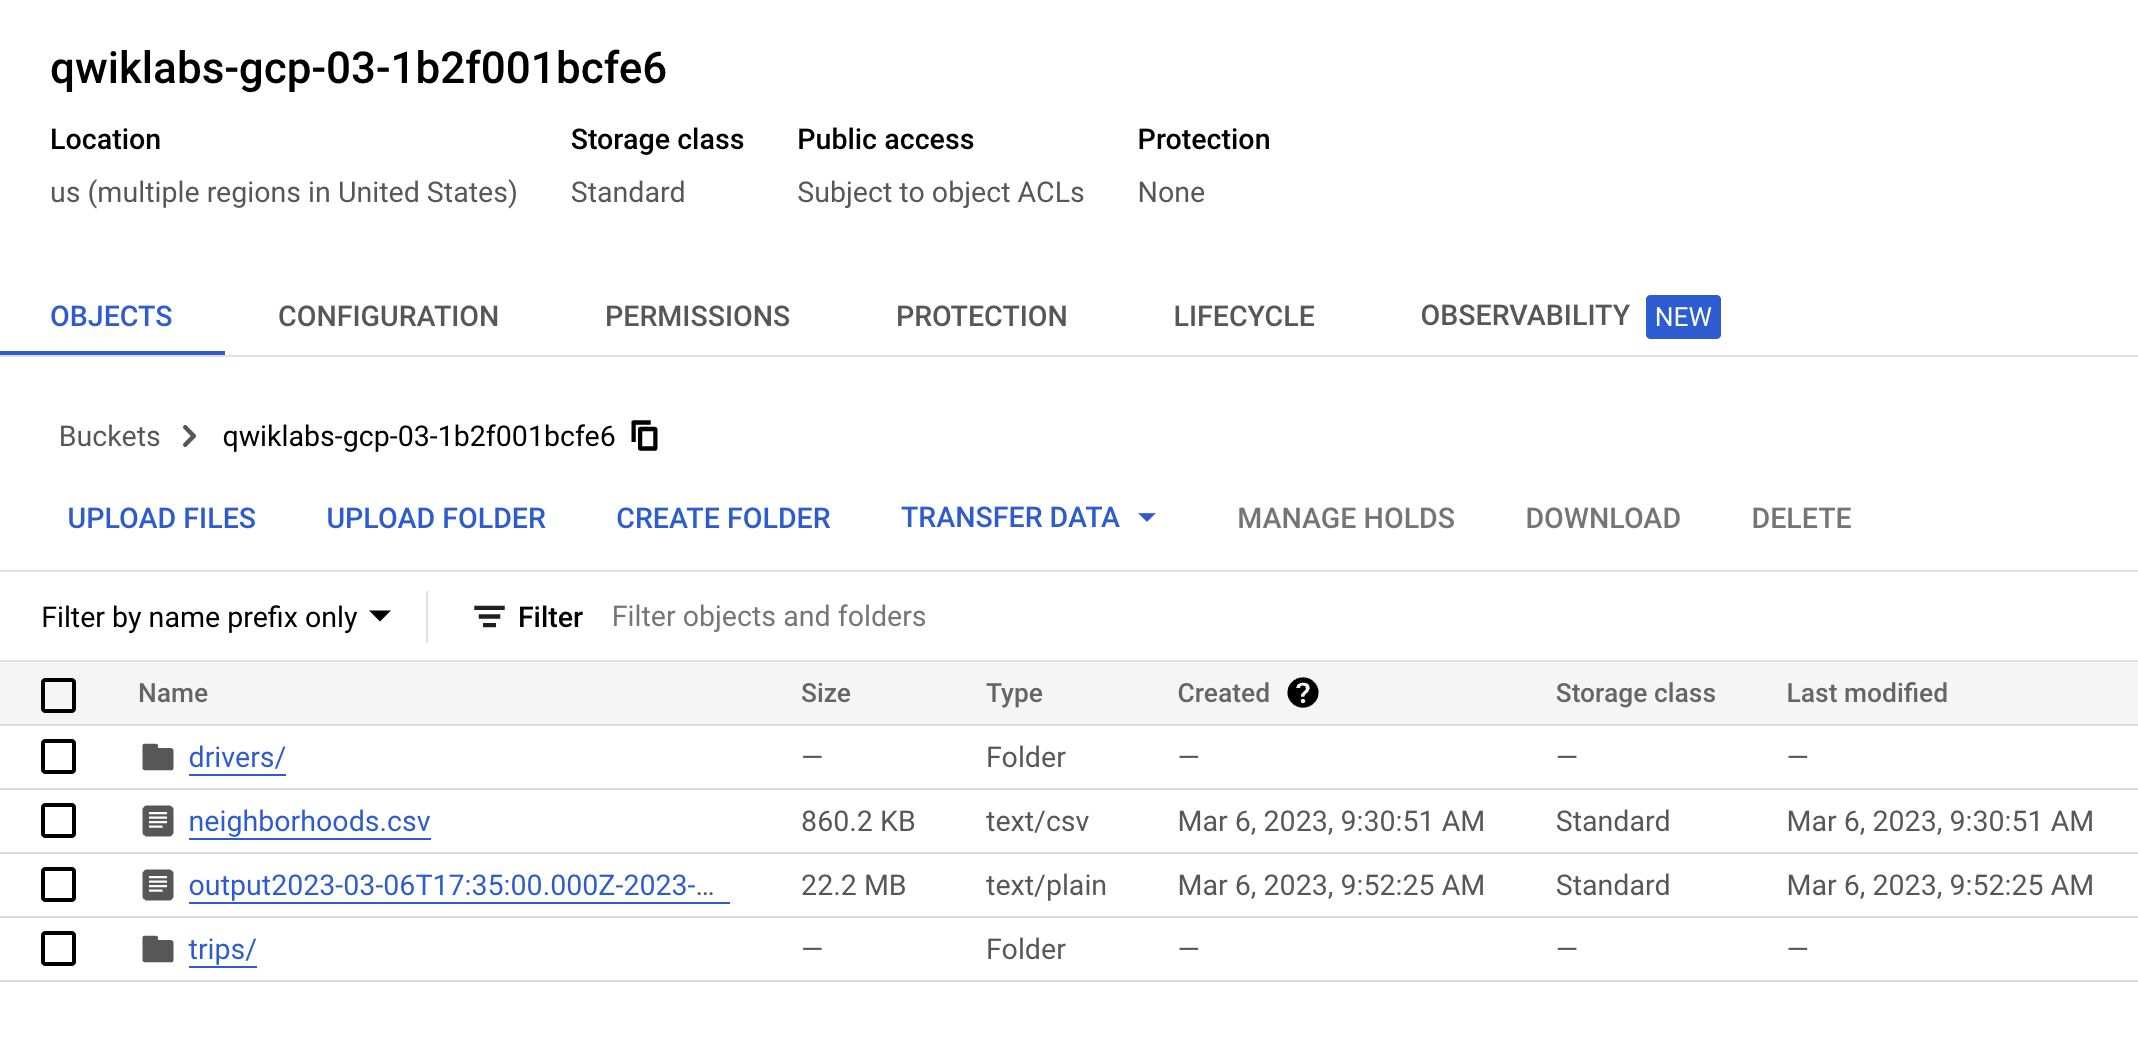
- Go to your Storage Bucket and make sure you have 2 folders and a CSV file, which should look like this:
Click Check my progress to verify the objective.
Task 6. Pub/Sub and Dataflow
Pub/Sub and Dataflow resources have been pre populated in your project, to check this first, go to:
- Pub/Sub:
- Check that there is a Topic called "Taxi"
- Subscription called "Taxi-sub"
- Dataflow:
- Check that there is a job called "GCStoPS" with status failed.
-
Click on the job and click clone to run this exact job. Rename it and check the job info (which you've pre populated since you cloned it) so you know what you're running. Scroll down and click Run Job.
-
Go to Dataflow jobs and make sure you job has status "streaming".
- Go back to Pub/Sub and go to the Taxi-sub subscription, click Messages and Pull - messages should start rolling in. This should look like:
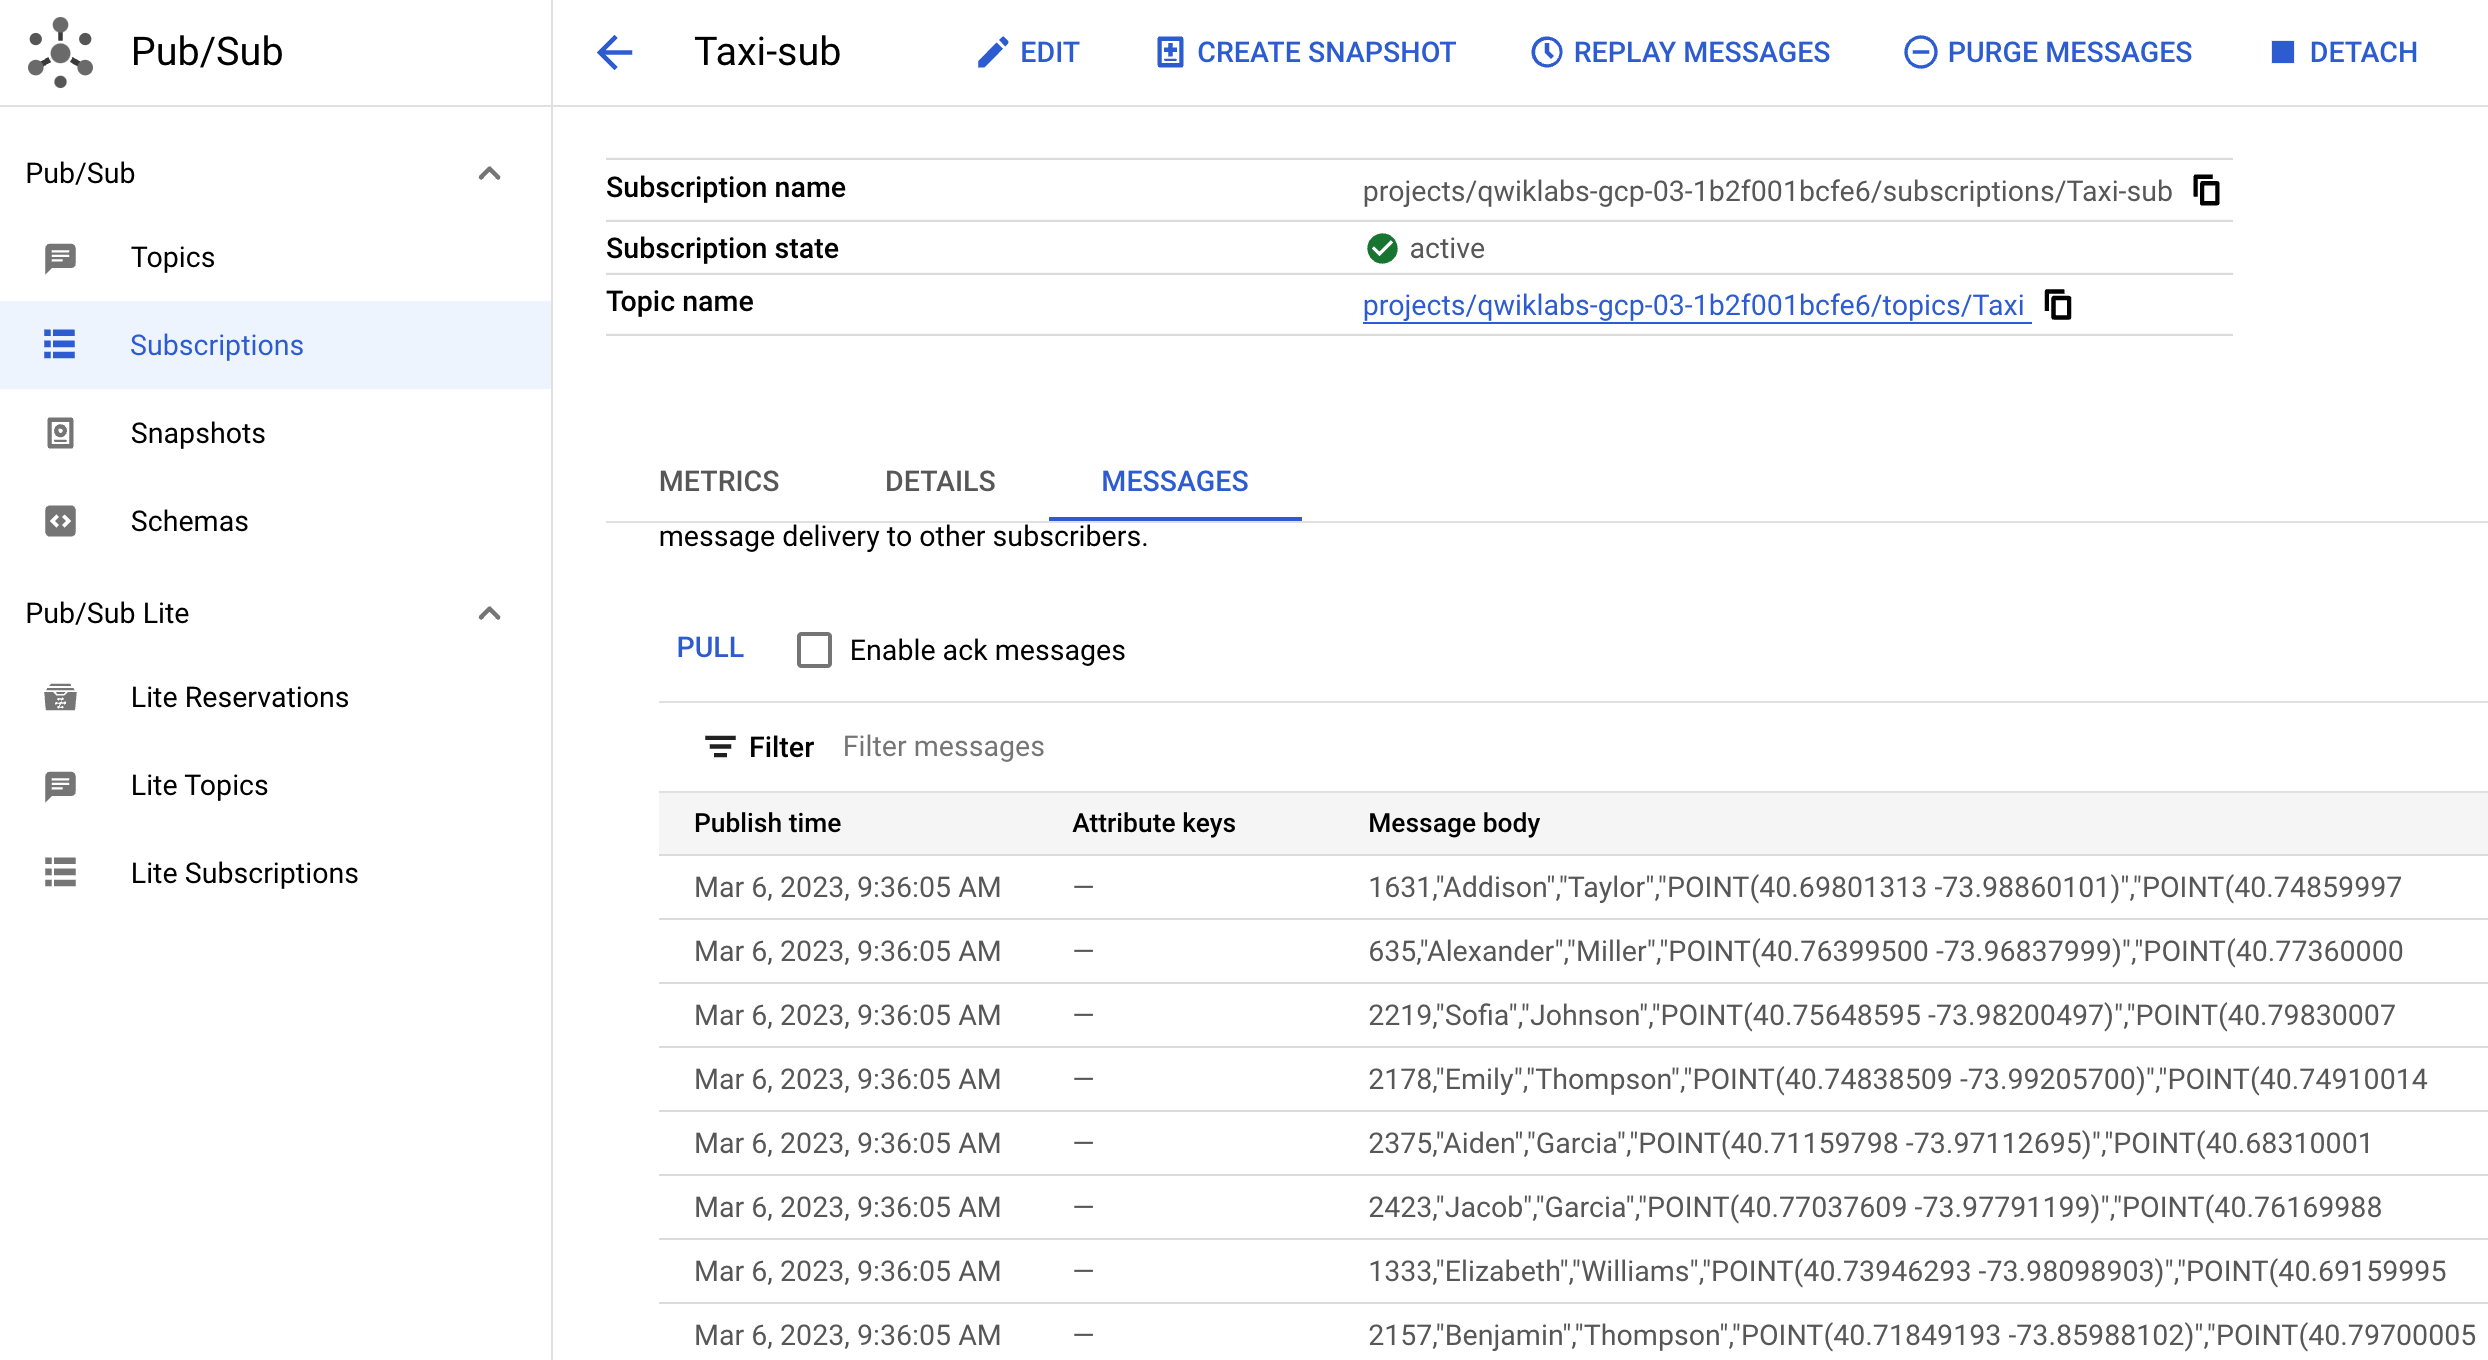
You've now simulated live data streaming! As an example, if you were to upload more data to GCS and Pull in Pub/Sub, Dataflow would be moving the data live.
Click Check my progress to verify the objective.
Task 7. Setting up a streaming architecture on Google Cloud
A common streaming architecture on Google Cloud consists of Pub/Sub > Dataflow > GCS. Set this up now, then plug SingleStore onto GCS.
-
Navigate back to Dataflow.
-
Click Create a job from template and name it
pstogcs(PubSub to GCS).
-
Template:
Pub/Sub Subscription or Topic to Text Files on Cloud Storage. Click Ok. - Output: the bucket you created earlier called "PROJECTID" (your unique project ID). You want the output of this job to land in the bucket you created earlier in the lab.
- Output filename prefix =
output-. This is to mark the output files clearly. - Click Optional Parameters.
- Input subscription is "Taxi-sub" which you just saw messages coming into.
- Don't need to include input topic.
- Default for everything else, then go to the bottom of the page and click RUN JOB.
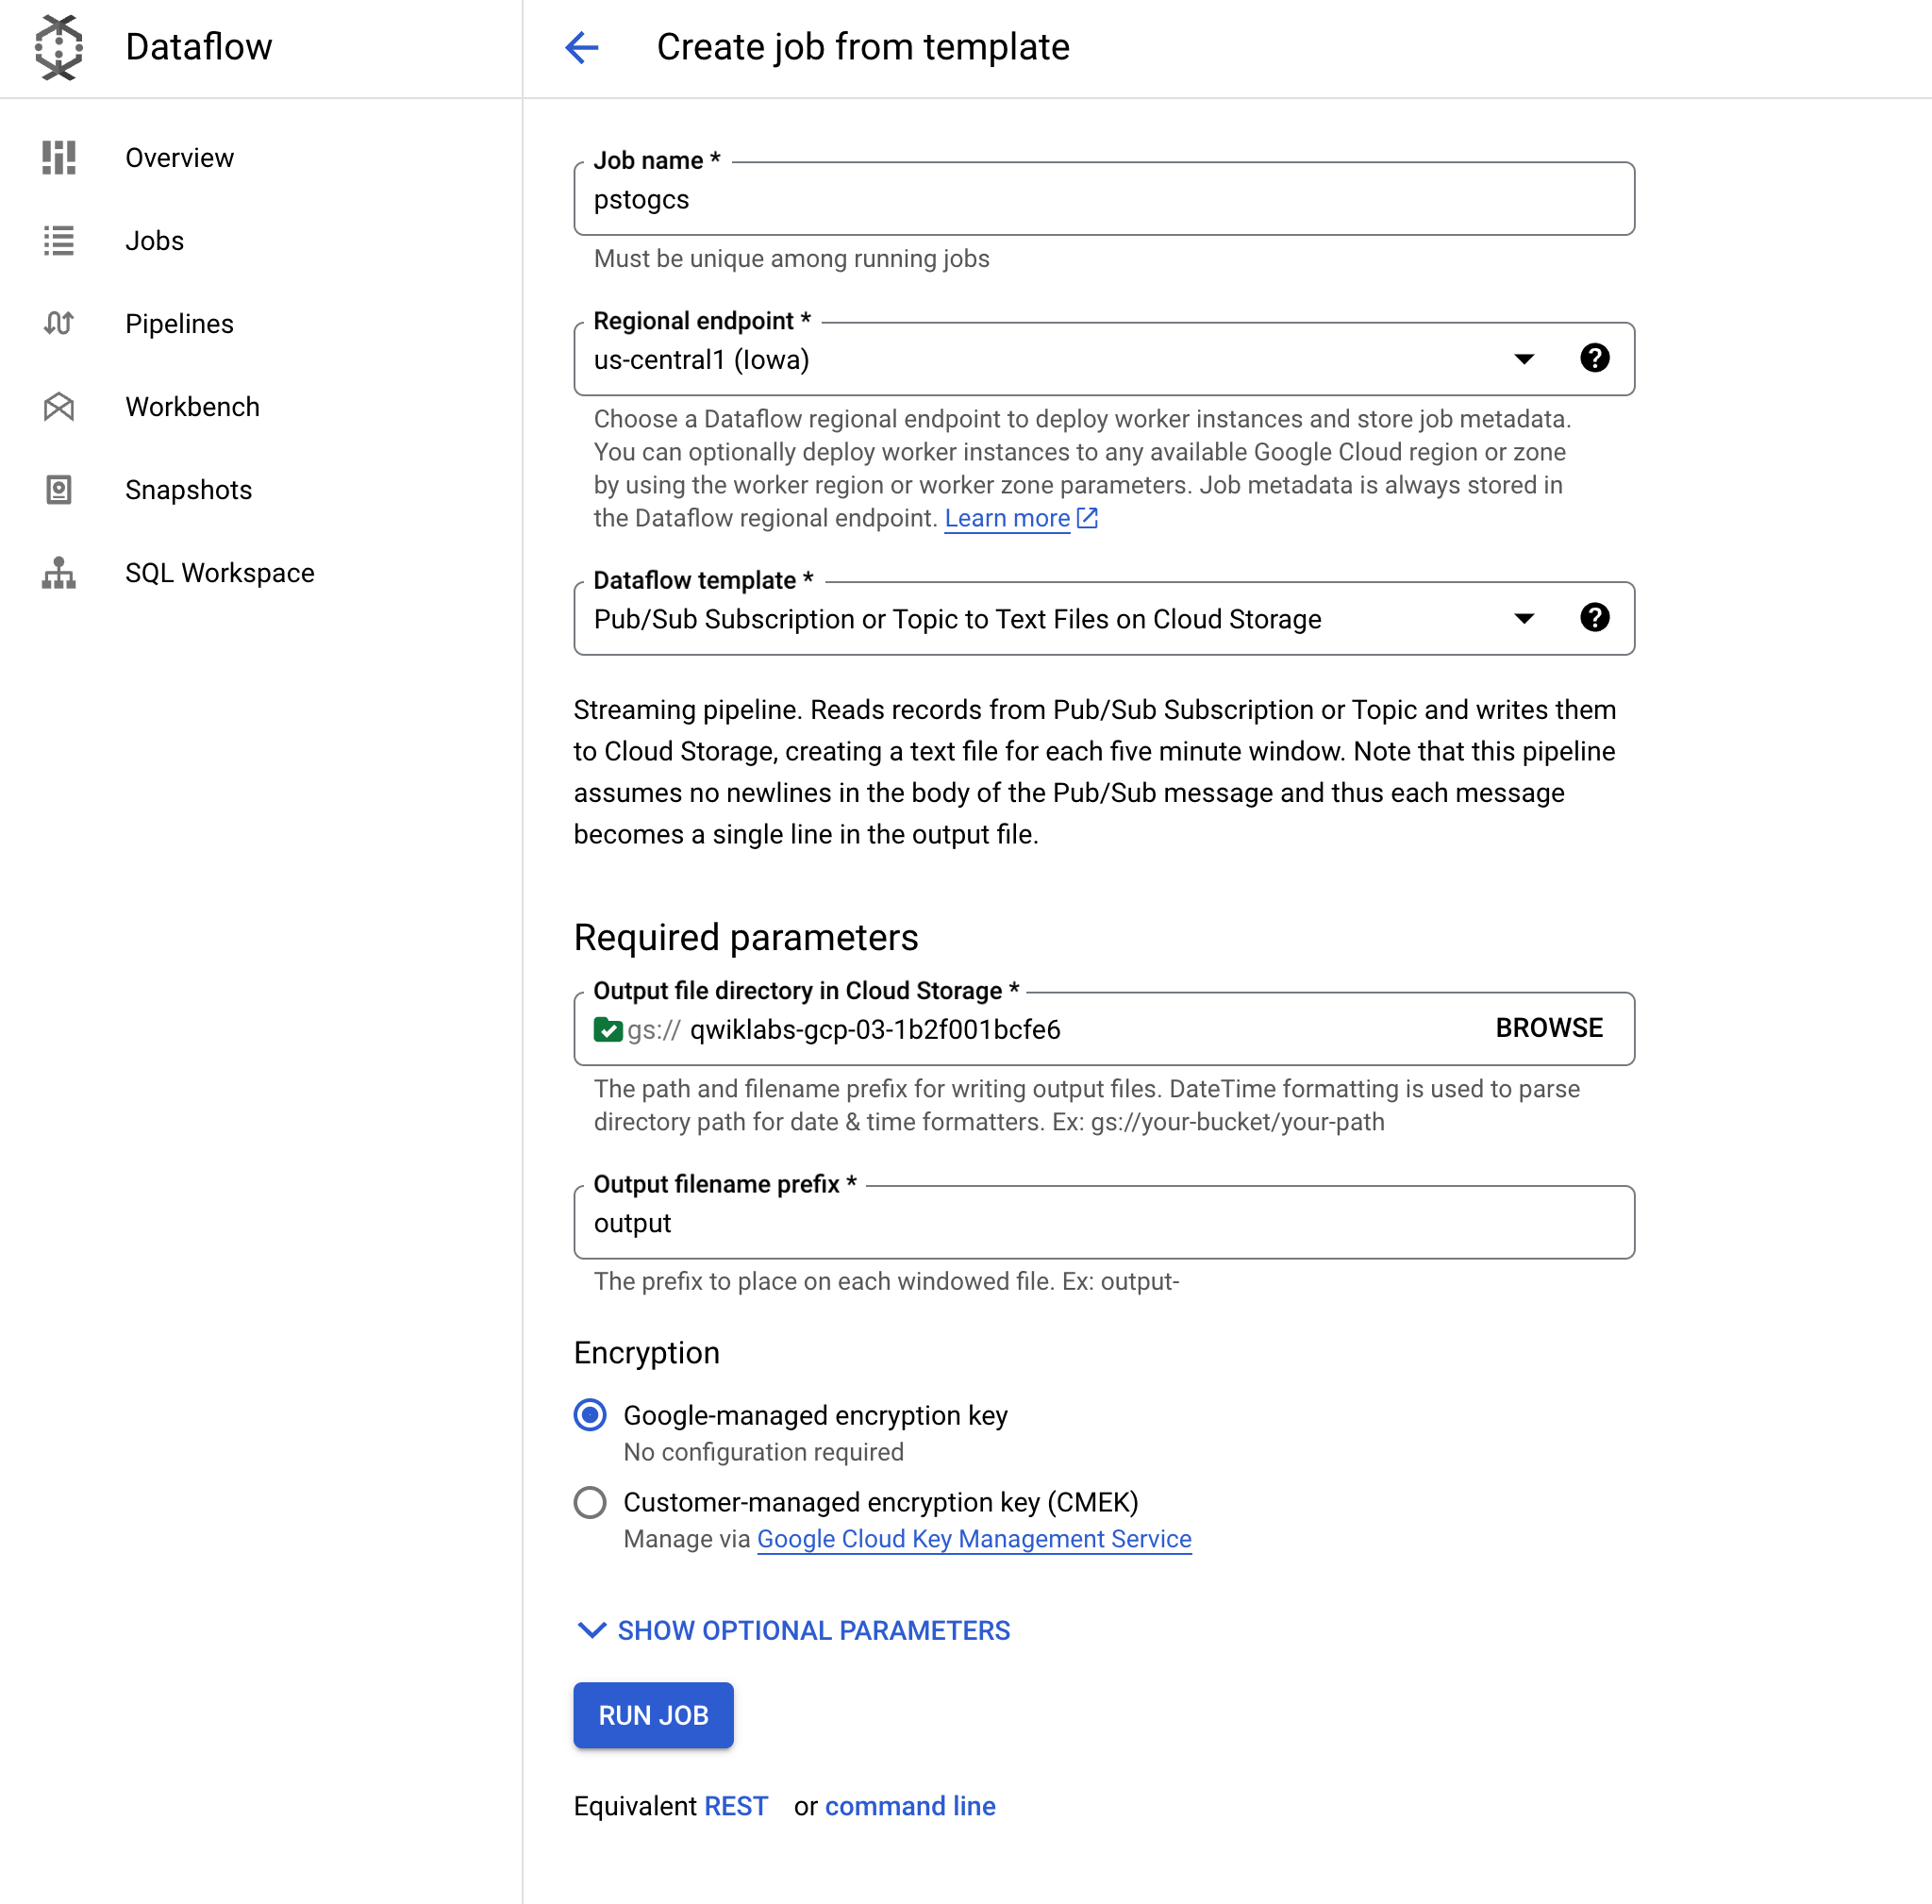
This Dataflow job should read the messages you saw earlier in Pub/Sub and Stream them into your Cloud Storage Bucket.
-
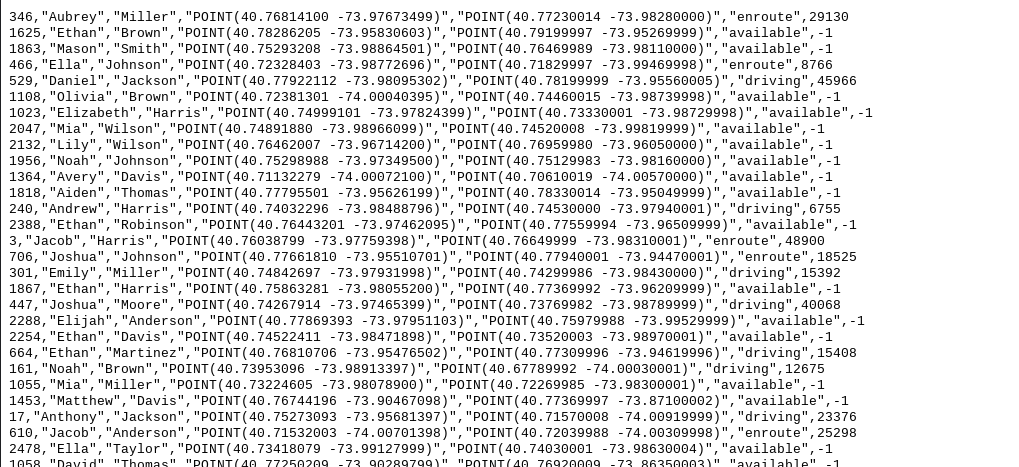
Go to your Cloud Storage Bucket. You should see a timestamped output file in the bucket.
-
Click on the output file and you should see Taxi data that includes names, coordinates and times
Click Check my progress to verify the objective.
Connect Cloud Storage to SingleStore
-
You need to create a Key to connect this private Cloud Storage Bucket to SingleStore. To do this go to Settings (third option on the left hand side of Cloud Storage):
-
Click the Interoperability tab. At the bottom, click Create a Key.
Now you will ingest data into SingleStore with Pipelines and start a stored procedure.
- Navigate back to the Cloud Shell tab with the SingleStore Terminal open.
- To create Initial SingleStore Pipelines:
- From the first CloudShell tab, click Open Editor. If prompted click Open in a new window.
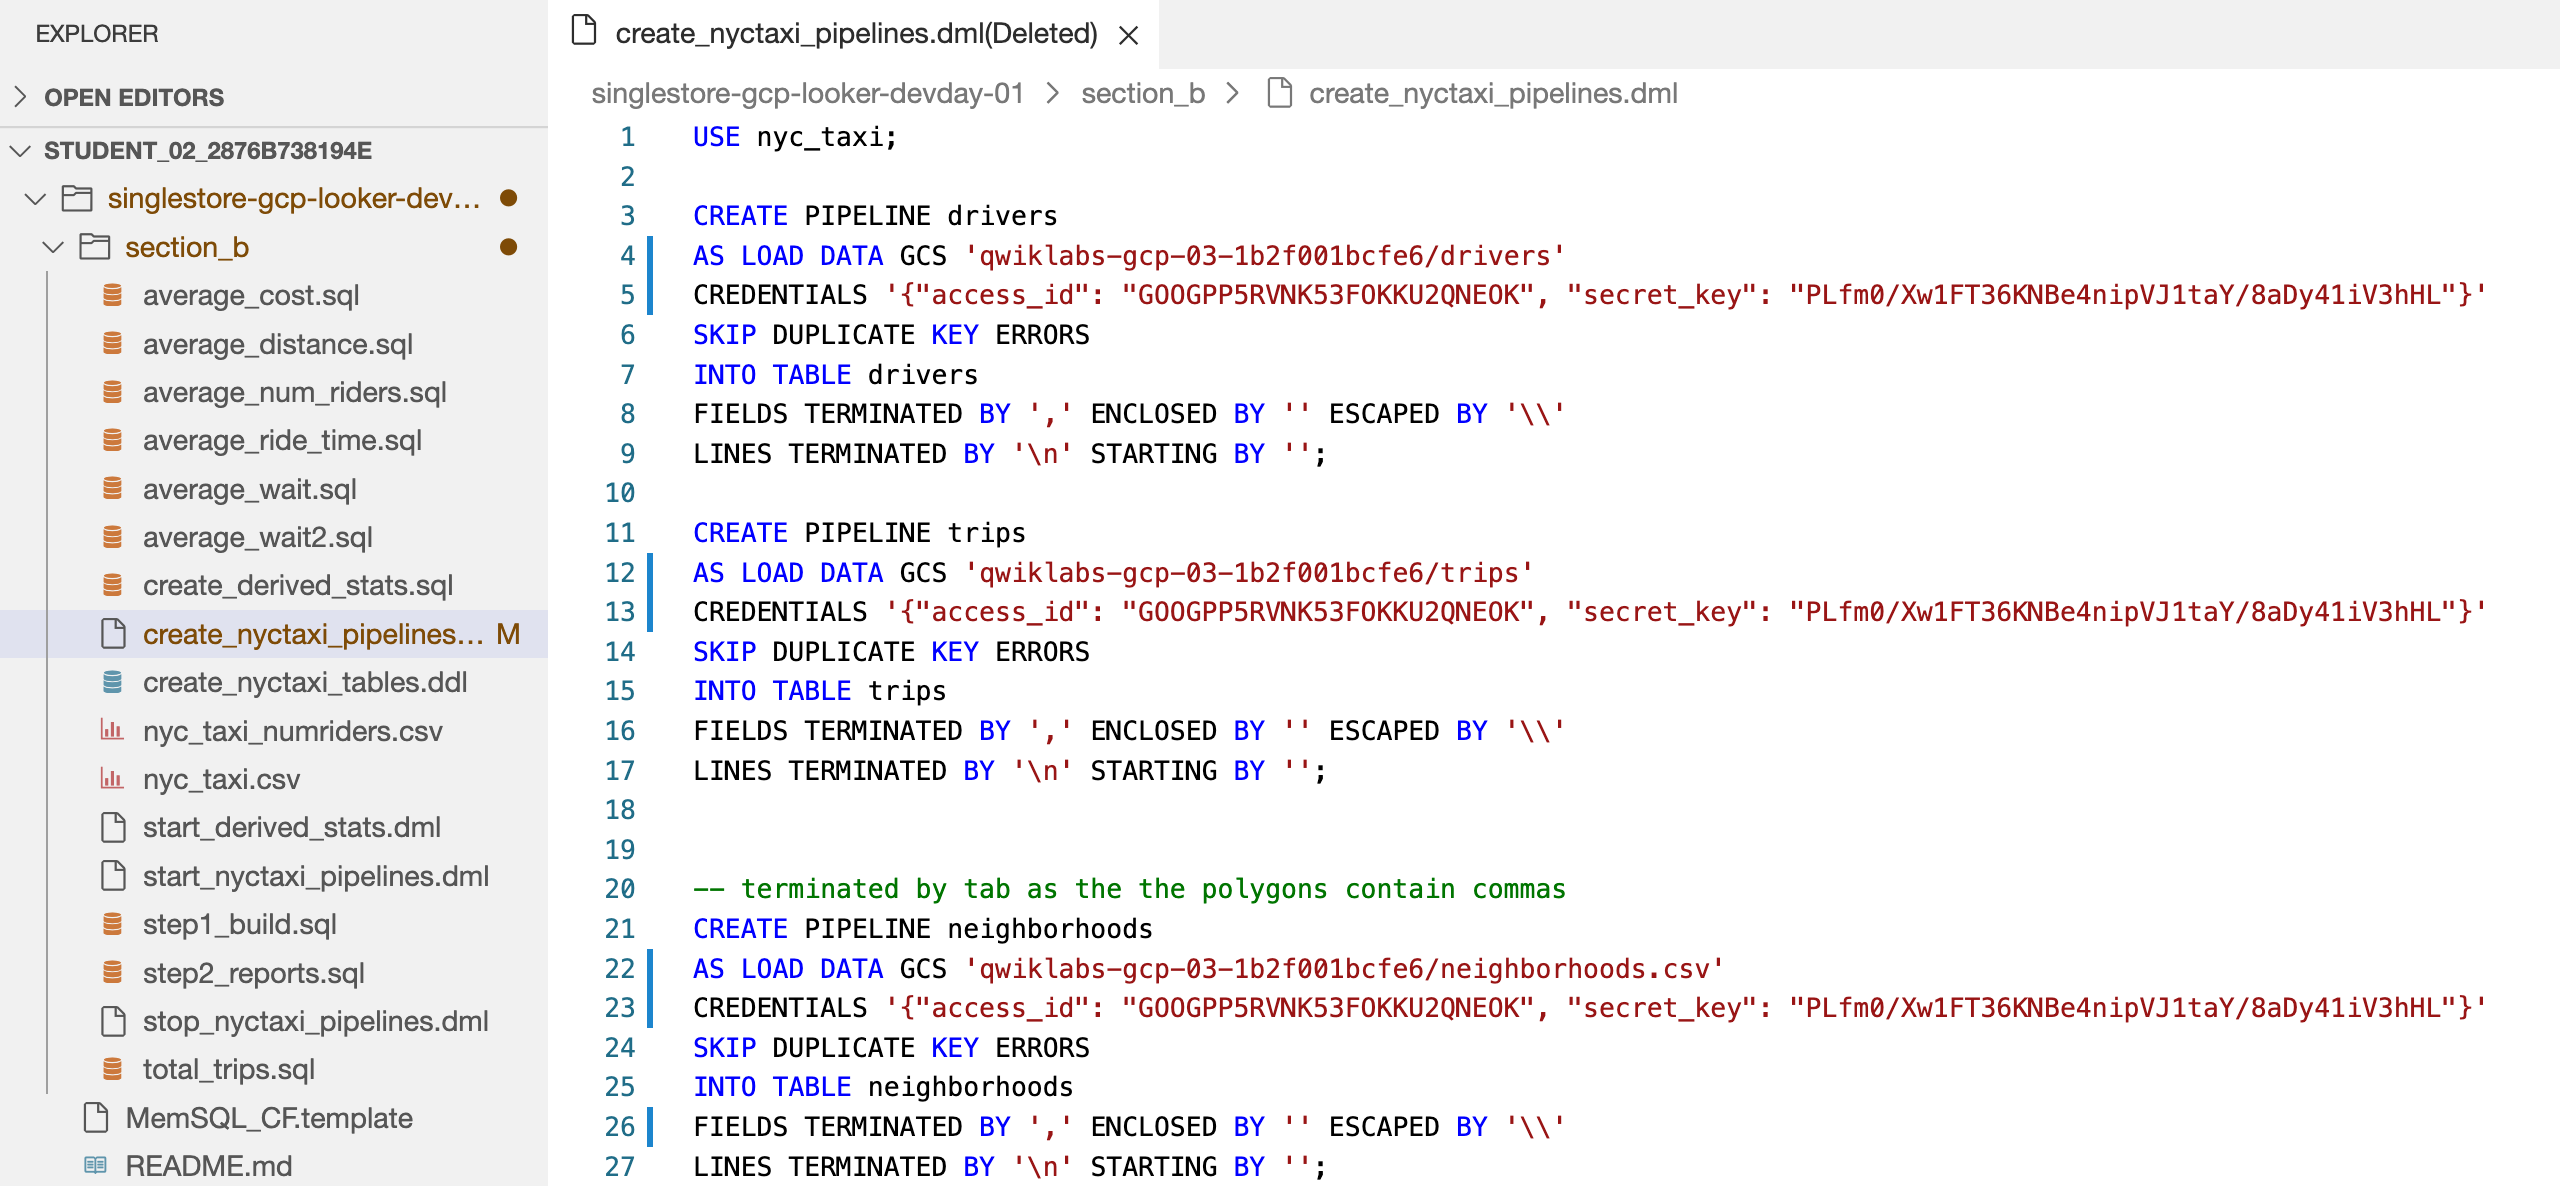
- Open the create_nyctaxi_pipelines.dml file..
- Make the following updates to the file:
- On line 4, change the bucket name to your bucket name.
- On line 5, add the Storage Bucket Access ID and Secret Key you just created.
- On line 12, change the bucket name to your bucket name.
- On line 13, add the Storage Bucket Access ID and Secret Key you just created.
- On line 22, change the bucket name to your bucket name. and
.tsvto.csv. - On line 23, add the Storage Bucket Access ID and Secret Key you just created.
- On line 26, change
/tto,.
Your file should resemble the following:
- Click Save and go back to the Terminal.
-
From the Cloud Shell Terminal, connect to SingleStore using the MySQL command you used earlier. You can use the same command you used earlier to connect to SingleStore.
-
At the MySQL prompt, run the following command to create the pipelines:
The output should look like:
| Pipelines_in_nyc_taxi | State | Scheduled |
|---|---|---|
| neighborhoods | Stopped | False |
| drivers | Stopped | False |
| trips | Stopped | False |
Task 8. Start Pipelines
- Run the following commands to start the pipelines:
Output:
| Pipelines_in_nyc_taxi | State | Scheduled |
|---|---|---|
| neighborhoods | Running | False |
| drivers | Running | False |
| trips | Running | False |
- Make sure the Pipeline status for all three is Running.
Task 9. Run Operational Analytic Queries
- Run the following commands to run the operational analytic queries:

Report 1: Total number of trips for each neighborhood.
- Then, run:
Report 2: The average amount of time between someone requesting a ride and that person being picked up.
- Next. run:
Report 3: The average distance of a trip.
- Run:
Report 4: The average amount of time between someone being picked up and that person being dropped off.
- Run:
Report 5: The average cost of a trip.
- Run:
Report 6: The average amount of time it takes from the time a driver accepts a ride to the time they pick up the passenger.
- Run:
Report 7: The average number of riders per trip.
- Run:
Congratulations!
Congratulations! In this lab, you have deployed SingleStoreDB and combined it with Google Cloud's cloud native products like Pub/Sub, Dataflow and Cloud Storage. You have also used SingleStoreDB's native pipeline to ingest data from Cloud Storage and run operational analytic queries.
You can learn more about SingleStore at SingleStore.com.
Google Cloud training and certification
...helps you make the most of Google Cloud technologies. Our classes include technical skills and best practices to help you get up to speed quickly and continue your learning journey. We offer fundamental to advanced level training, with on-demand, live, and virtual options to suit your busy schedule. Certifications help you validate and prove your skill and expertise in Google Cloud technologies.
Manual Last Updated August 28, 2023
Lab Last Tested August 28, 2023
Copyright 2024 Google LLC All rights reserved. Google and the Google logo are trademarks of Google LLC. All other company and product names may be trademarks of the respective companies with which they are associated.